-
Day 20 of our dream home build – Foundation walls poured!

Since our last post, we’ve seen so much progress!! I think I’ll say that during every update because our builder and his crews are moving SO fast!
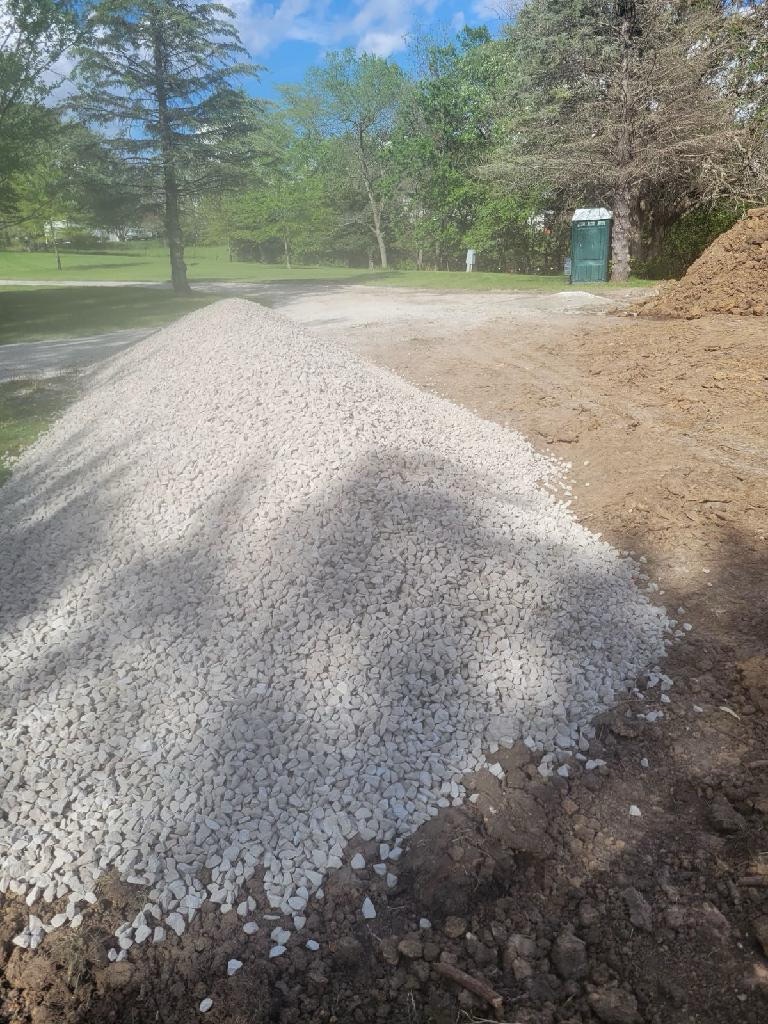
Let’s see. We’ve had the concrete footers for the foundation poured and a gravel delivery.

Last Monday we got a bit of heavy rain, so no action that day. Tuesday they started on the wall forms. To anyone who may not know, they basically line up all these pieces to make a mold for the walls to be poured. They worked on this into Wednesday as well. Wednesday we got our foundation walls poured! They brought in 2-3 concrete mixers to get the job done! This was so fun to watch.
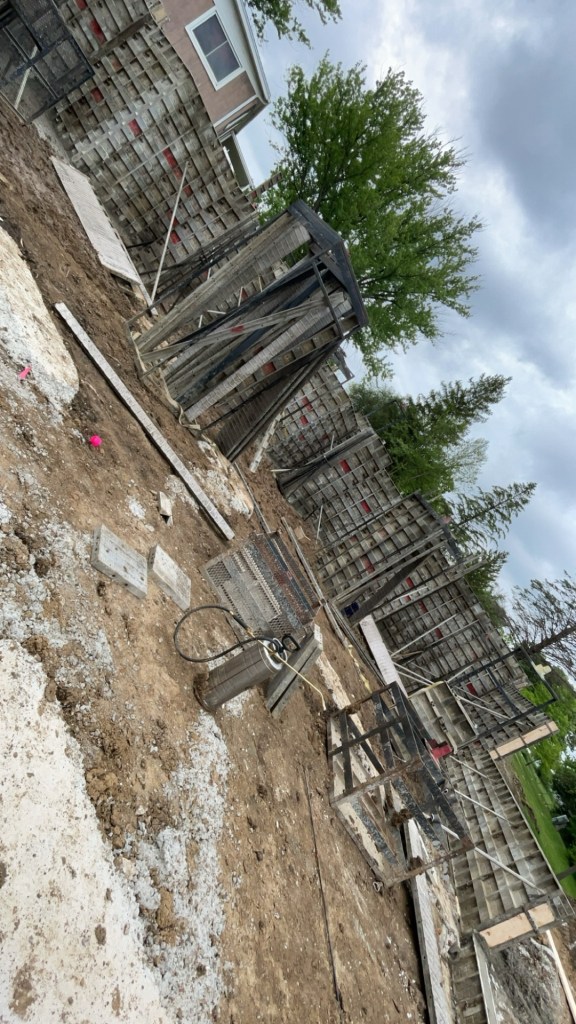
Thursday they removed the wall forms and now it looks SO REAL!
I watched a waterproofing truck drive up, but unfortunately didn’t observe his piece of the process before he drove away. Our builder stopped by on Friday with the black tubing or “tiling” as Brandon said. I’m guessing this drains away water? I’m not sure, I just look out the window!

We’re at the point now where it’s starting to look like the footprint of a house. We assume next we’ll have our concrete garage and foundation floor poured, followed by framing? The builder already has all of our walls framed and ready to install once we get to that point.
This Wednesday we’re meeting with the kitchen/bath designer. It was supposed to be last Friday, but there was a conflict, and this thankfully gives us more time to get all of our ideas gathered! We’ll need to go to the meeting with our appliance list, ideas on plumbing fixtures, kitchen sink, etc! We have a good idea already on cabinets, but this is where I’ll look to Rose from R Kitchen and Bath to help us make final decisions. I’m hoping Thursday/Friday I can write up a blogpost with all of our decisions we made! This is one of the parts of the build that I’m most excited about, and it felt like this day would never come!
I hope you liked the update! I was ready to write this post early last week, but with a baby it kept getting pushed back and then there was more and more progress to report on! Not a bad problem to have though!
Thanks for reading!
Davien
-
Cloth diapering thoughts – one month in!

Our baby will be 8 weeks old on Saturday! She’s a very good baby who mainly eats and sleeps a lot! And like any baby, she needs diapers! For the first month of having our her, we used disposable newborn diapers since she was a smaller baby. For wipes, we started off with the hospital provided wet wipes, but soon after started using our cloth wipes. Once baby was a month old and started getting too big for her newborn diapers, we made the switch to cloth diapers instead of buying a bigger disposable diaper size and haven’t looked back!
Our stash – initial investment/cost – $472
35 cloth diapers – $350
We have a total of 35 Nora’s Nursery cloth diapers (in the pocket diaper style), all purchased from Amazon when they were 20% off. I was planning to go the route of a diaper raffle with contributions to my diaper sets instead of the traditional disposable diapers, but I bought all of my diapers when I saw they were having a sale. Each set of 7 is $70, so my total diaper stash was $350 without including the sale discount/tax. Here’s one set I have, but they have so many cute ones to choose from!
Nora’s Nursery on Amazon 40 cloth wipes – $40

Nora’s Nursery on Amazon I LOVE our cloth wipes. We have two of these sets, so 40 total. Because we have so many and we can just wash them, I can be pretty liberal when using them. Note that they do stain occasionally, but it doesn’t bother me!
Set of 3 spray bottles – $10

Amazon These spray bottles are the perfect size and have the perfect spritz. We keep one in the diaper bag at all times and one on baby’s changing table. The third will likely go with our baby to daycare! If it isn’t clear, we use these to spray baby’s bottom while wiping her down.
2-pack diaper cream – $22

Amazon This diaper cream is awesome, and we also used it when she was still in her disposable diapers. We are just getting to the bottom of our first jar, but there was a week where I was using a very, very liberal amount to help baby get over a diaper rash.
2-pack diaper pail wet bags – $20

Amazon These fit right into my standard diaper pail. I’m not including the pail itself in my stash since it’s a pretty common purchase whether you go disposable or cloth.
10 charcoal inserts – $30

Amazon We haven’t used these much, but we keep them on hand to act as booster inserts if baby becomes a heavy wetter or starts sleeping through the night.
Our setup
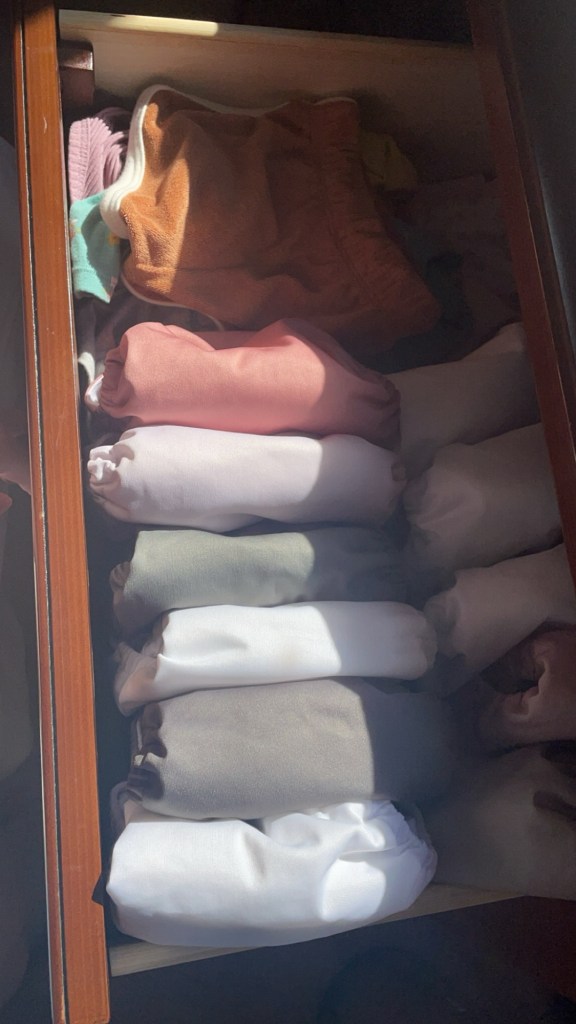
At home, I just use one diaper station which is her changing table. I initially changed her diapers in the pack n’ play if we weren’t back in our bedroom, but bending over to change her was killing my back! Plus, I’d prefer to just have all of her diapering supplies in one spot. So at her changing table, I have a spray bottle, diaper cream, and a (secured!) glass container of wipes. In the top drawers of the changing table are her fully prepped pocket diapers. I never have to fit a full 35 in the drawers because some will always be in her diaper pail, diaper bag, hanging to dry, or of course on her bottom!

For on the go, we bring one of the wet bags that comes with every diaper set of Nora’s Nursery. We don’t put anything in there besides dirty diapers. Our clean diapers (usually just 3-4) we just put directly in the diaper bag. Then our cloth wipes, glass spritzer filled with water, and diaper cream all go in one of the green pouches that came with our cloth wipes. Of course, we also have a changing mat in our diaper bag.

Our diaper change process
Cloth diapering is so easy once you figure out the sizing of diapers. In our case, we have snaps and for information on setting the size of Nora’s Nursery diapers, check out her website because I am not a pro! To change baby, we unsnap her diaper and if it’s pretty dirty, I might first wipe her with a dry cloth wipe just to contain the mess a bit. Sometimes I even set a clean wipe down over the mess just to limit her getting her feet dirty. Once it’s pretty under control, I’ll spritz her bottom directly with the little glass spray bottle. Simply wipe off with a dry wipe! (And likely repeat! lol) Then we put her diaper cream on before snapping her new diaper on. There are only 3 rise settings on our cloth diapers, so once you have them set, you won’t need to resize the snaps for a while. We currently have her on the smallest rise setting, and the only snaps we need to worry about when putting on her diaper are her thigh and waist snaps. Because she’s still so young, we have her on the tightest setting for both. Finally, put the dirty wipes and diaper into the diaper pail or wet bag. All done!
Our wash routine
This really isn’t too bad! I first replace the dirty diaper wet bag in the diaper pail with a clean, empty wet bag. If I don’t do this, I probably would never come back and put my new wet bag in there, lol. I then make sure we didn’t have a wet bag of dirty diapers in our diaper bag. Next, I take everything to the washer. I take out each diaper and shake out any wipes (we like to put the dirty wipes in the dirty diaper) before pulling the insert out of the diaper’s pocket. I do this for all of the diapers then put the wet bag and any of its remaining contents into the washer, too. For a typical wash, I’ll have cloth wipes, inserts (these are usually the cotton ones that come with each pocket diaper), diapers, wet bags, and any clothes or bedding that was soiled.
Because our baby is breastfed and not eating solids, we don’t do any manual rinses at this point. We do a warm/cold setting for a normal wash cycle and plop a Tide Pod in there. We make sure to use a strong detergent instead of anything too gentle to ensure the diapers get clean. We then follow that cycle with a warm/cold extra rinse. Again, please note that this wash routine will definitely change once our baby eats solids!
When the washer is all done (this takes longer than necessary because I usually forget to go back and start the extra rinse), it’s time for the dryer! To preserve our diapers so they last as long as possible, I drape 4-5 diapers over a clothes hanger and hang it from this rod below our wire shelving. I really wanted a clothesline, but I must admit this works just as well and is probably quicker/easier to do and not weather dependent. Anything that isn’t a diaper gets thrown into the dryer WITHOUT a dryer sheet. I think this is supposed to protect baby’s bottom. IF we had a more modern dryer, I’d say we put it on tumble dry low for x amount of time. However, our dryer doesn’t have many settings and takes a long time to dry, so we have it run forever until we check that the clothes are done.
The longest part of the process is actually airdrying our diapers. If I hang dry them by early evening, they’ll be ready to stuff by the next morning. You could totally put them in the dryer and successfully complete a load all in one day, but again, I like to be extra gentle on the diapers since they’d be more expensive to replace. To stuff the diapers, hold one end of the cotton insert and quite literally stuff it in the pocket diaper, but make sure it lays flat in there to best cover any places that could get soiled/wet. Finally, I just button the outermost snap so they’re easier to store in the dresser drawer. That’s it!
For us (or Brandon would correct and say ‘for me’, since I do 99% of our cloth diaper laundering), each day we at a minimum are either stuffing the previous diapers or also starting a new load of diapers. I have never gone more than every other day for washing cloth diapers! I tell Brandon if I went more than two days I’d probably never do them!
Final thoughts
I am so happy with our cloth diapering! We’re super lucky that we work from home, have a working washer/dryer, and will have a home daycare that supports cloth diapering. Without that, it would be much harder to do.
Nora’s Nursery has been great for our baby, and I don’t have any reason to try out different cloth diaper/wipe brands. While I love our cloth diapers, I do think the cloth wipes are particularly AWESOME and something that is worthwhile even if you use disposable diapers. We noticed our baby didn’t fuss when wiping her down with cloth wipes/water compared to when we used typical wipes. Plus, the pros are endless. Your hands don’t get dirty or wet, you can use a bunch without feeling wasteful, and you don’t have to worry about running out as long as you keep up with washing them. Plus with the spray bottles, you can be so much more targeted when cleaning up! Finally, baby’s bottom is dry at the end of the diaper change if you do a final pat down with a dry cloth.
One thing I may reconsider later on for this baby or the next is whether we want to keep our diaper pail. It fills up pretty quick given that cloth diapers ARE bulkier than disposable, and if we had them in a basket instead, they’d be able to air out more and we wouldn’t have to reach our arm into the wet bag when putting them in the washer. For now it works fine, but just something I’m considering! TBH more often than not I just leave the dirty diaper on the changing table instead of taking a few seconds to stuff it in the pail. I think if we just had an open basket, I’d be more likely to drop them in there instead of leaving them to pile up on the changing table.
So far, our only ongoing expense with our baby’s diapering is maybe an extra container of Tide Pods every few months and reordering diaper cream. Everything else can just be reused for this baby and the next!
If you have any cloth diapering questions, I’m probably not the best person. I’m no expert and still have a lot to learn when our baby starts solids!
Thanks for reading!
Davien
-
Day 8 of our dream home build – We have a hole in the ground!

Hello! It’s been a week and a half since we signed with the bank and the builder, and we’ve had lots happening! Last week we got our build permit, a portapotty, and our internet cables moved above ground and out of the way of the future house. Yesterday we had electrical lines rerouted, trees removed (sad!), and our basement dug! It was so fun to watch them zip around in the excavator and skid loader!
So far we’ve had no surprises during the initial site prep besides needing to spend about $500 extra to switch to a gas water heater and furnace. When the electrical company came over to splice wires (which allowed them to maintain power to our current house), they said the electrical box we already share with our neighbors would be at capacity. To keep the water heater and furnace as electric, it would be thousands more dollars to upgrade the box AND we’d have to dig up our neighbor’s beautiful yard. Our yard is covered in weeds so I’m not too defensive of it, but our neighbors work so hard to keep their yard looking nice. Which with us being at the end of the lane, makes it almost look like our yard is nice! Safe to say we decided to go the gas route as a workaround!
Today we have workers outside digging footings with a backhoe. They’ll put in rebar, create forms, and pour concrete! Then within a few more days we should have either the basement walls or floors being poured!
With how fast this build is going to go, there’s so much to keep us busy over the summer. One of my maternity leave projects has been to sell anything we don’t want to move over to the new house. I first learned how to sell on FB marketplace when I had some wedding florals to get rid of. It was a great experience and really made me comfortable with listing things we don’t need. So far the only thing we’ve purchased from FB marketplace has been a stove a couple years ago, but I could definitely see myself using it to purchase bigger kids toys secondhand (like dollhouses, play kitchen, etc).
Besides cleaning out our house to help prep for the move, I also really want to tackle a laminate project! There’s a Wilsonart product called Re-Cover that I ordered from Home Depot in Black Alicante. Unfortunately the wrong product was delivered although my order receipt shows the correct item. The color was right, but they sent me a real laminate sheet! That has a more complicated installation process than the Re-Cover laminate I ordered.
Anyway, I’ve got the right product on the way from Lowe’s now, and the Home Depot mixup is on its way back to the store. The reason I want to do a project is to see whether it’s realistic to make a full fireplace surround/mantel out of a stone look laminate. I love the look of the real stone fireplaces, but it is not in the budget for our initial build! I’d love to give this idea a try before deciding if we’ll just need to go with something more simple that’s still within budget. Don’t worry, we’ll have an electric fireplace, so no fire hazard here with the laminate!
We also want to do a kitchen backsplash in the same Black Alicante laminate as what we’re putting on the perimeter countertop. If the Re-Cover laminate is pretty easy to work with, we could either make the backsplash ourselves or possibly create a little ledge like the real stone splashes have! The cost would be so doable, likely $500 or less for a real stone look.
Besides that, I think we have most things figured out for the new house. We won’t be buying anything expensive while we’re beefing up our emergency fund (to account for having a mortgage in our expenses again) and knocking down the loan principal, so I’m excited to see how we can get creative with furnishing our new home. The most important thing will be repurposing what we currently have either with paint, changed hardware, or just being happy and grateful with it until we are able to find something that fits our new house style better. Of course I’ll try to post about any projects we work on, even if the picture quality isn’t good!
That’s all for today! I need to go check the build progress out the window! Thanks for reading!
Davien
-
Builder update – It’s go time & process overview!
Wowee! It’s been a while since I’ve updated my blog as I adjust to taking care of our perfect little baby, but I’m ready to get back to posting consistently. We have updates on our house, and it feels so good to have the bank piece squared away and the builder working hard to get us started! First I thought it’d be good to go over all of the little tidbits we had to take care of to get to the point where we are now in case it’s helpful for someone planning to build. Note that this is just what we did for our new build + teardown, so it’ll likely be different for others.
Going way back to the beginning three years ago, the very first thing we did was decide our ideal budget given what we needed out of our future house. You can start with the plan first, but we knew we weren’t at risk of setting a budget higher than what we needed to build LOL. We knew how much we could save per year, how many years we could save for, and also how much felt ‘comfortable’. For reference, our budget was way below the mortgage budget tool that google gives you.. we didn’t want to live just one emergency away from foreclosure!! Or spend the next how many years worried about how we’d pay our mortgage if something went wrong! Once we set our budget, we simply saved saved saved! We set our savings goal per month and when we did our budget, everything else like groceries, gas, spend money had to come after that. It became so important to budget monthly for those bigger, less frequent expenses like car insurance, vehicle registration, etc so we didn’t get blindsided and miss our savings goal. (BTW by the time the builder was ready for us, we’d saved 30% down, but after getting our real estimate, we were over budget and therefore ended up at just 25% down.)
For the tear down, we learned that in our area it’d be easiest to work with the bank if we had the old house/land paid off. Keep in mind we live in a small town where housing isn’t expensive. In a city, you may have enough real estate demand or appraisal power to have the old mortgage rolled into the new one and still come out ahead on the value of the teardown/rebuild. For us, that was unlikely given our location. Our town doesn’t see a whole lot of new construction or have demand for new construction, so we were at risk of our appraisal coming in below our cost to build. In order to build what we want and not have to be as worried about the bank signing off, we decided it was best to pay off the rest of the mortgage.
Once we got all of that saved/paid off, we focused our savings on closing costs. Using google, I estimated our closing costs and we saved for that target.
We also saved the design fee the builder gave us. This covered them drafting the plans we sketched (well, 3D rendered too since we had so much time on our hands LOL) and make any tweaks. It also included them doing all the stuff we of course didn’t know how to do like figuring out all the roofing and structural requirements! Note that they didn’t do the design work until they were ready for our project and didn’t have us pay the design fee until the contract was signed.
The remaining savings chunk we needed was for city fees like our build permit, sewer, gas, utilities, etc as well as tear down estimate of the old house.
Now, we didn’t have all of these miscellaneous expenses saved up when we decided on a builder and started reaching out. We were naive enough to just start with our down payment, but once we got close to finishing that, that’s when we looked up all the other costs that would be coming our way. I don’t like being stressed out, so this is where I spent a lot of time planning in addition to the actual design of the home! We also had more time than planned given that the builder was busy on other builds. I am so thankful that they weren’t ready for us when we came to them!! This allowed us to keep saving for longer and really nail down what we needed versus what we could hold off on.
Once the builder was ready for us, we did all of the drafting and back and forth with design changes to make sure we had it perfect. Now I’ll point out that at this stage we didn’t discuss particulars like exact flooring, exact countertop, etc. I kind of thought we’d end our estimate phase with particulars, but the builder got a feel for what level of material/finish we wanted for various parts of the house and got bids/estimated off of that. It seems like for the most part they have allowances based on what certain things have historically cost for customers. As an example, we know the flooring allowance we were given will pretty much just cover the main wood flooring and we’ll be paying out of pocket for our tile material and install. On the other hand, we got asked if we wanted blinds inside our two sliding doors after we signed for the builder and bank, so we inquired about price. Turns out they were already included in the estimate, so by us not wanting blinds in our bedroom slider just the basement one, we got a credit for the price difference!
Now once we had plans and an estimate from the builder, we started working with the bank. They recommended we go to a specific bank that they were used to working with. We wondered if we should shop around a bit and see what rates we could get for the construction loan, but ultimately decided the builder’s recommendation would be best. This was such a good choice because the bank and builder were keeping each other in the loop which sped up the process! During the build, I imagine their existing relationship will also help make sure draws happen on time and our build doesn’t stall due to miscommunication or procedural issues.
The process with the bank was fairly straightforward. They pulled our credit, had us fill out an application, and needed us to submit the plans and estimate. The appraiser was then sent out to look at our land minus existing house and using our plans, determine how much it would be worth. The appraisal number that ended up being used was with the comp/sales based approached not cost to replace. The bank will only loan out based on the appraisal or cost to build, whichever is lower. For us, our cost to build came out lower since we had land equity on the property already. Once this piece was done, the bank had us send in our abstract to be updated with the title office then had their attorney finish up the remaining pieces. We also needed builders risk insurance for the appraisal value which we tacked onto our existing home insurance policy.
To actually close on the loan, we only needed 10% down. Historically you’ve needed at least 20%, but it seems that this particular bank was trying to encourage more construction loan business by offering a lower amount down. We’re going to start with this amount and pay the rest of our down payment towards the end once we’ve gotten past any potential for big unexpected expenses around the site work just in case. Less down sounds nice, but for us it just isn’t going to be worth the higher mortgage payment! As far as logistics around closing, Friday we wired over our down payment + closing costs since Capital One doesn’t have a physical location nearby for us to get a certified check. On Monday we drove to the bank and signed all of our paperwork. Just like that – we closed on our construction loan!!
One note about our closing costs – they ended up being less than a third of what we estimated which was awesome!! Also I should point out that while our appraisal is higher than our cost to build – the cost to build is actually more than the house itself is worth. We estimated our land value based on the county assessment and thought that equity could be put towards our down payment. However, about 60% of that land equity is just helping our house be worth more than it costs to build so we don’t end up underwater! This may not be ideal for others – but this is our dream home and the years we’ll spend here will make this worth it in the long run.
Now after we signed at the bank, we drove straight over to the builder’s office and finalized our exterior selections before signing our contract! We also paid our design fee, but didn’t realize until later that this would’ve been included in our estimate and didn’t need to be paid upfront like we’d saved for.
The builder has wasted NO time with getting started now that we have the loan and contract straightened out. Oh I should probably mention that when we went to sign our contract, they said they had over half of our house’s walls framed in their shop already LOL! A day after signed, the builder came to our house and staked out the outside corners of the house, calculated our slope to know how big the hole needs to be, and looked at our site’s hookups. Our sewer seems to need to go right through our existing house to be ideal, and we ultimately decided we could wait to connect sewer to the new house until after the old is torn down. The builder said this would be a day or two without any sewer, which is a small price to pay for how much more efficient it’d be in the long run versus putting in more of a workaround solution.
Today as I type, the builder and utilities guys are outside mapping out where things run through the ground. Our build permit literally just got approved (like minutes ago), so once we pay the fee, we are just waiting on two days straight of good weather!
This has been such a long update but I hope it helps someone to see all of the steps we took to get to where we are today! If you really want to build a house, you won’t let anything stop you even it takes way longer to get started than you think! Expect another post this week (pending little baby’s temperament) as I summarize our final exterior selections as well as what we have planned next!
Thanks for reading!
Davien
-
Builder update – final plans and estimate!
Hello! A lot has happened since my last post with the initial estimate. We were in constant communication with the builder and making tweaks and changes to our plans, which made summarizing them in a blog post difficult! Things have now settled down, and we’ve pretty much landed on our plans and estimate. In fact – we’ve sent them to the bank, and we’re currently waiting on the appraisal report! The builder has also taken a look at our lot to get a feel for the slope. The builder and the bank both want our current house torn down as part of the final step of the build – the bank for its own assurance that it will be done and the builder for the dirt to do final grade of the new house.
Also, we got a little busy with having a baby! Our sweet baby girl has been doctor diagnosed as perfect two times! She sleeps and eats so well, and she hardly fusses! Despite such a healthy baby, we’ve also been a bit distracted by me developing postpartum preeclampsia a few days after being released from the hospital. Although it’s been a bit of a hiccup, I’m feeling better and excited for our home build to get going! The appraiser thought he’d have the report done by the end of the week, and that’s the main thing the bank is waiting on. Once the bank gets its side done, then we’re ready to go under contract with the builder! We really do think we’ll have a hole in the ground this month if all goes well!
Now that we’ve really slowed down on changes, I thought I’d go over some of the decisions we’ve made since our last update. Our changes have involved both those that increase price and those that decrease. I’m pleased to say with all the changes, our estimate went up less than 10k from the initial number! That said, we know our flooring will be over the allowance for sure, and we have to save separately for appliances since those aren’t included in the build.
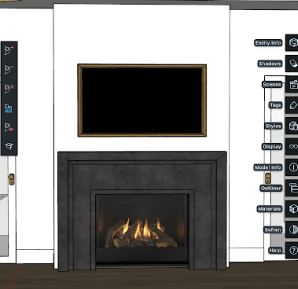
Electric fireplace in living room
We decided to go with an electric fireplace instead of a wood fireplace. First we were going to go with a gas fireplace just for ease of use and cost, but when Brandon was talking with the builder, he made some good arguments for just going with electric. This should save quite a bit of money and also give us more flexibility over what materials we use on the fireplace for now.
As far as the mantel and surround, I have a pretty wild idea that I’m not sure is feasible. I really like the look of a stone surround, but it’s so expensive. I also really like our laminate choice of Wilsonart Black Alicante we have picked out for the perimeter countertop in the kitchen. How cool would it be to have a surround built out of this same laminate sheeting? We’d have no fire rating concerns by going with the electric fireplace, so it’d mainly be a question of whether the laminate sheeting can be molded around the trim pieces. It’d be super durable, and I think it would look so cool if we could make it happen. Plus if it looked nice, I don’t think I’d be in any hurry at all to get a real stone surround!
That said, I’d also be perfectly happy with making something work within our fireplace allowance if it’s easier to just have them build a mantel for now and pick an inexpensive tile for the surround. We could live with that for quite some time.
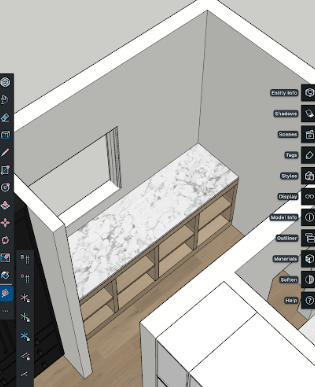
Simplify pantry for now
We’ve decided to really change up this space and use our dollars elsewhere. Before, we were going to do full cabinetry, a prep sink, and a second dishwasher (that the builder didn’t even know about or they probably would’ve questioned us). Instead, we’re going to have the window be a half foot wider to match the kitchen windows, run a simple countertop of some type of laminate (wood look? marble look? matching the perimeter countertop?), and have more open storage versus cabinets. As far as what we’ll do with our storage, I’m not sure! I do like the idea of curtains, but I’m not sure I’d want the entire area to be curtained. I think this will be a case of us building it with just shelves and deciding what coverings, if any, we want after living with it for a bit.
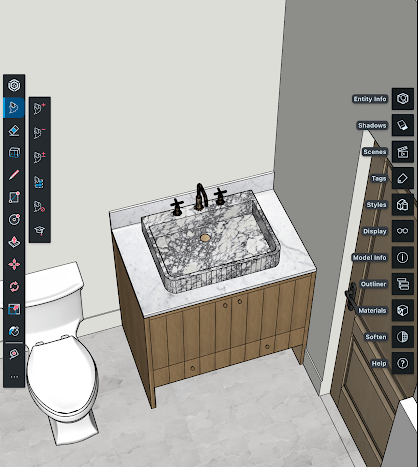
Primary bath vanity
We made a few changes with the bathroom vanity. For one, we switched out the Carrara marble countertop with a simple white Onyx countertop. This was what was quoted in our initial estimate, so we decided it’d be a good starting countertop that’ll last many years. We also changed from two sinks down to one! The main driver here was that we have no problems sharing a sink today, and an extra sink decreases cabinet/countertop space and is just one more thing to clean. Some additional benefits of going down to one sink also include purchasing one faucet versus two, two sconces versus three, and one big mirror that we’ll actually just bring over from our current house and frame out ourselves.
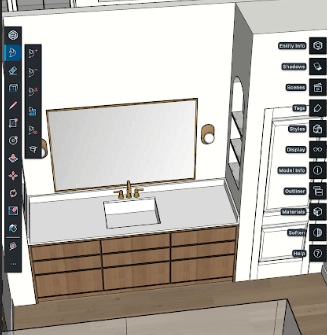
I also found a wood toned cabinet on display at the Omaha CKF showroom that I liked much better than the earlier cabinet selections I’d noted beforehand. I’d even be happy with this door style too!
CKF Overall, we’re pretty happy with the changes here!
Kitchen
I think we’d initially rendered a 48″ range in our kitchen, but we’ve since decided that a 30″ like we have today would be just fine. We have our eyes on this Cafe one, which is dual fuel (gas cooktop and electric oven) and has two ovens. This would be great for when we’re making my vegan chik’n and Brandon and the boys’ regular chicken at the same time.

Home Depot Flooring!
When we did our initial estimate, we were prepared to find a laminate or LVP that fit in budget. However, the more we thought about it, the more we preferred hardwood that’s stapled or nailed down instead of a floating floor. This is going to have us over our flooring allowance quite a bit, but flooring is so important that we’re willing to make it work. We’re still not sure what flooring brand/color we want – but we’re leaning towards engineered hardwood floors instead of solid hardwood. The day we went into labor with our baby, we spent all day looking at flooring while staying near our hospital just in case. We found a few flooring samples we like, and we plan to have our builder (or the designer they work with) help us track down a good quality option that matches what we like.
We’re still set on our laundry room floor (the marble from Floor and Decor), but it seems like the builder would prefer a click/lock flooring or tile instead of vinyl adhesive for the guest bathroom. We’d initially switched from tile to help save money on material and install, but it seems like it may be in our best interest to go back to tile. We’ve got some time, but I’ll need to find another option unless I want to go with the more expensive tile I found at TileBar!
Those are our main changes we’ve had up until now! Here’s hoping that our appraisal comes in where we need it, and that the ball gets rollin’ soon! Once the build starts, I’m sure I’ll have lots to post with progress pictures and links/pictures of our brand specific choices for all the finishes!
Thanks for reading!
Davien
-
Builder update – reviewing our initial estimate!
Hello everyone! We’re 35 weeks pregnant, and our builder reached out just in time with our dream house initial estimate! I’m so excited that we can finally give an update on our home build journey! This is just the beginning of all the fun stuff I’ll have to share about our home, and I can’t wait to get further into the process and see everything come together!
Now, if you’re doing a custom home, you’ll understand how hard it is to figure out how much money your dreams and ideas are going to cost. When we started down this path, we had an idea of what we were hoping to spend.. then we decided we could go up another 20%.. then we started following Dave Ramsey and learned we most certainly should not unless we also increased our down payment LOL. Which after waiting longer than we thought to get started on our build and sticking with our dedicated savings plan, we were able to do but still preferred our original number (not +20% !). Well, let’s just say I’m glad we (happily) came to terms with waiting on the finished basement because without it, our estimate came back 14% higher than what we’d originally wanted to spend. We knew that this was more of a target to aim for than something that was realistic, so given that we came in pretty close to it, we’re happy with what all we’re getting for the price!
Going over the estimate, there were a mix of items called out as included (some with the brand/style specified) and items like countertops/cabinets/flooring that just had allowances. I was a little worried seeing the allowances because while they seemed like healthy amounts, I know I have a taste for the finer things when it comes to home design, so were they based off the standard options or what I had in mind? That was definitely something we noted and when we reviewed with the builder, I was so happy to hear that they did take into consideration what we liked and for example, the cabinetry was quoted from CKF using the Summit door style and colors I had referenced. This alone was a great relief!
Below, I’ve included a project picture of the Summit door style from CKF.

CKF Now a big potential budget breaker was regarding the deck off of our bedroom. This was estimated as a wood deck, with nothing underneath. We noticed this meant that the additional square footage we requested to the basement footprint must’ve been left out by mistake, and that could substantially increase our budget. When we met with the builder, we were pleased that they were onboard with what we were thinking for a primary patio, which is best described by a picture such as this:
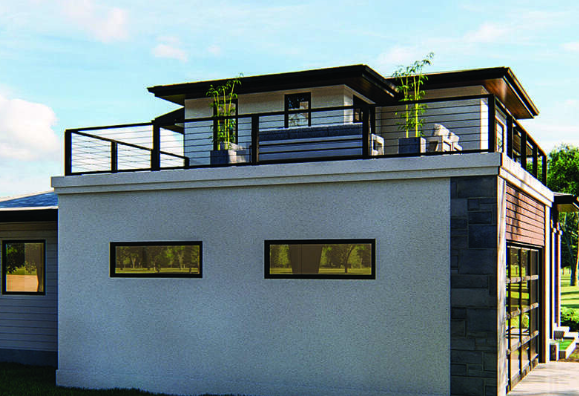
America’s Best House Plans In our case, this would be a smaller patio of 20’x6.5′, covered, and would be above a bedroom in our walkout basement versus above a garage. If we didn’t want the missing square footage in the basement for a fourth bedroom, we would’ve been just fine with a deck. However, as a soon to be family of five with plans to have more babies in the future, extra bedrooms were a top priority.
As far as numbers go, the builder didn’t seem too concerned about how this would affect the estimated price of the build. Before our meeting, I had taken the current price per square foot (total construction cost/main floor square footage) and determined our absolute worst case scenario by multiplying it by the additional basement footprint, but the builder assured me it wouldn’t be that expensive. The basement walls don’t actually change, they just flip from being an inside corner to squaring off, so no increase there! We’ll of course have more concrete for the basement floor and additional floor trusses to support the upper patio, but the builder’s main concern was making sure that part of the basement wouldn’t leak with its ‘roof’ exposed to the elements. He’s got a few ideas, but he wants to make sure he picks the best option over good/great, so this is likely where we’ll see the majority of the increased cost. Overall, I felt so much better once we got this question out of the way!
On the topic of increasing price, I did request smooth walls versus orange peel texture. For this, I got some (well placed) hesitation around flaws/shadows being more apparent, but I knew I would regret it if we didn’t push on it. I grew up with a dad that drywalled our house and smoothed the walls to perfection all by himself, so I know it’s doable. Plus, having smooth walls would put us in a good position to do wall treatments in the future. The jury’s out on how much this would increase cost, I was expecting around $5k, but the builder made it seem like it might be more of a cookies/beer bribe for the drywall/paint guys than an additional cost in the estimate!
I also requested that the trim height be raised from 3 1/4″ to about 5 1/4″, which is more standard for 9′ ceilings (per my research). We have teeny tiny baseboards in this house (where we have baseboards – the house is primarily carpeted!), and I’m not a big fan of the look in our house. This was estimated to cost about $1-2k more, primarily because we have a lot of square footage to cover on our main floor.
The final item that we thought may increase cost was the herringbone lay in the primary bath. Overall, the concern appears to be more around finding an LVP that comes in herringbone and will match whichever main (straight lay) LVP we choose. It makes sense in hindsight, but they can’t just click the flooring in diagonally if it wasn’t manufactured to do that. So there’s really no additional cost here as long as they’re able to find one we like! Worst case scenario, we just go with a standard flooring lay instead of herringbone.
Now the fun part, things that bring the cost down. The biggest change we made was actually Brandon’s idea! I would’ve never thought of this on my own, but he suggested we put a gas line in the office but wait to do that fireplace since it only affects one room. It’d be a very easy fireplace to do later since we were planning on framing it out from the office wall anyway versus having it built into an existing wall. This would not only slash our fireplace cost in half (about $15k was quote for two fireplaces), but we’d be able to get the fireplace material we want down the road instead of putting something in that’s more temporary. Even though we were planning on doing a fluted marble tile here, that was still more of a step in the right direction versus the statement I would make if I had endless dollars. For the fireplace in the living room, I believe the estimate was done with more standard materials, so we’ll likely pivot from the marble tile we had picked out and do something more simple like a black porcelain tile and black wood/MDF surround. These fireplace changes may come close to covering our additional cost for that basement square footage!
Another cost effective decision we made was to keep casement windows in a few key areas (where we didn’t want a slider obstructing the view), but otherwise using sliders. We have sliders in our existing house, and they still slide well after being installed in the 70s! For us, we didn’t feel strong enough one way or the other to not make this a cost based decision, though some say that casement windows are more energy efficient.
We were also able to remove the tiled kitchen backsplash cost from our estimate because we’ll be using the laminate backsplash that matches our perimeter countertops. Lockers/bench were included in the mudroom, but we cut that out since we get by ‘fine’ today. (Fine in quotes because the coat hooks don’t get used as often as we’d like and shoes usually end up right in front of the door!).
Another substantial budget drop was with our bathroom shower. Ugh, you know we had our hearts set on marble tile in there. However, we were already fine with going the onyx countertop route for our primary bath vanity for now, so we opened our eyes to the idea of an onyx shower, too. Our goal is to not go above the initial estimate we were given (which was technically over our original budget), so we decided this was one place where we’d be picking a highly rated cost effective solution in the meantime and getting what we want later after we tackle more important things like getting the basement finished so the boys can have their own rooms again and guests can have a place to stay. What also made us fine with this decision was the fact that our builder hadn’t worked with marble much, and although we fully trust them, some of our marble dreams may be best to wait on just so we can get someone who’s already experienced with the material.
For the shower, we’d still be able to keep our two glass top pony walls with a hinged door (similar to this example), as well as a bench.

Onyx Collection The main cost savings we’d have with this shower system is less expense around water proofing, especially for the shower floor (per the builder). I’m thinking this could be a great example of where we could go with something simple (like this white subway tile look or possibly the full panel walls) and then see if we can add some marble pencil trim around the border and/or possibly a marble ledge for the top of the pony walls? The builder said we can mix and match where we have tile vs. onyx in the shower, so this will just be something we work with their designer on!
Finally, the drywall niches! The entry way niche will be almost exactly as I want after some back and forth on what I was thinking (and why LOL), as well as demonstrating with my Sketchup render! We’ll be able to have the sconces inset in the niche and do our shelf surface! I’m still TBD on the material, onyx was brought up by the builder, but here I’d even question if we should just build our own surface with laminate/contact paper as our own side project. For the primary bath niches, I originally wanted three on each side as separate dry wall cavities (the top being arched). The builder suggested we do one drywall niche with shelves inside of it, which isn’t exactly what I was going for look wise. However, they also weren’t too keen on arching the tops, so it may make sense to just have the open space and then add in drywalled and framed shelves, an arched top, and cut marble shelf ledges ourselves as a little weekend project sometime, too.
As much as I would love to have every little detail jam packed into our house right from the get-go, as Brandon says, ‘we need to wait for the money to catch up to us’ (LOL). Also, every detail is another thing to manage, so I want to make sure I have all my focus on what needs to be done right at build time (floor plan, flooring, windows, wall texture, etc) and pick more standard options for other things that are easier to update later on if we aren’t happy. Plus at a certain point, these custom details just delay the build and us being able to move in/stop paying interest only payments for construction.
Overall, we had a great time meeting with the builder. Homework for us is to send my updated basement render (which I can finally share now that the main floor footprint is finalized!), so they know where to place bedroom windows and plumbing rough ins. Also, we learned that the central placement of our stairs in the basement will require us to locate the water heater and furnace in a less ideal location than the initial draft showed. I think we can make it work, but it will disrupt the flow we had planned for the common area of the basement. In addition to that, we need to also follow up on a painted vs stained door casing/jam question. As for the builder, they’ll send off all the tweaks and revisions we’ve made on the draft and estimate so elevations/renders can be drawn and the estimate updated. It’ll be interesting to see how the numbers change after our meeting yesterday. Honestly, I could see it staying roughly the same or otherwise slightly heading in either direction. Once we get the estimate, renders, and elevations back, I believe we’ll work through the contract phase which is where we’ll need to do the sign off with city/bank. Then hole in the ground!
It’s been SUCH a long time coming, but I’m glad that we never once stopped working hard on both our design and savings for the dream house. All the prework we did is starting to pay off, and we finally believe that we’re building this year! In fact, I wouldn’t be surprised if our yard was torn up in April!
Thanks for reading!
Davien
-
My 2024 goals + 2023 recap

My favorite holiday is New Year’s Eve/New Year’s Day because I love reflecting on our achieved goals and creating new ones! 2023 was quite the whirlwind. We became totally debt free, got married, pregnant, went on a family vacation to Washington DC, got a new (used) vehicle we love after an unexpected life event, and started working with the builder! It was such a great year with lots of change, and I feel like we really set a great foundation for all areas of our life. This will also be our first full year with a shared budgeting tool (YNAB) that will be so helpful as we soon enter a costly time with variable payments for a construction loan, one off purchases for the new home, and of course baby expenses.
Now before I talk about my new 2024 goals, I’ll recap my 2023 goals. Honestly, they weren’t written as well as I’d like after learning so much about how to set good goals at work. I think I focused a lot on whether they were measurable (did I do them or not?), but I really missed out on saying what they help me achieve or what my outcome is.
- Read 20 books: Done! I actually exceeded my goal by reading 33 books!
- Get married: Done!
- Blog weekly: I can’t say I blogged weekly. I think I blogged in spurts, and averaged about 3-5 posts a month. This is an example of where I wish I’d focused on outcomes instead of tasks. My goal was probably to blog regularly, whether that be measured by posts per week or month.
- Complete 5 Chloe Ting Challenges: I completed two full challenges once I got back into the habit of exercising regularly and found my groove with the when/how. The last three months of the year I still worked out or walked 4-5 times a week, but I had to set aside Chloe Ting in favor of 2nd trimester friendly exercises.
- Find a salad I like: I found a ranch dressing recipe I really like, and I’m not sure why I don’t make it more often. I think I accomplished this goal, but achieved little because it didn’t measure whether or not I actually ate more salads or vegetables!
- I won’t post specifics here, but basically my goal was around how to stop going over in food, gas, and personal spending categories: I achieved this! Once we got set up with YNAB and started creating a combined budget together where we could take into account all of the things going on in the month, this issue went away. I don’t think budgeting jointly was the fix because this was an area where I struggled before Brandon and I started living together, but basically I just didn’t have a good budgeting system down. I would budget my spending and savings per paycheck, so a gas heavy trip at the beginning of the month may have made me feel in the negative until the lighter half of the month. There wasn’t enough of a date range in my budget/expense tracking to have variable costs even out over time. Budgeting and planning at the month level (and really – sharing accountability/responsibility as a couple) helped so much!
- Stay within my time limit on my phone regularly: I think by the end of the year, I achieved this goal. Having monthly goals and working off of a Microsoft to do list showed me how precious my time is!
Overall I am very happy with how 2023 went, and I am so grateful for all of the wonderful things that came with it. I will never take for granted how easily I was able to get pregnant and how smooth my pregnancy has been. Now, let’s talk 2024!
This year we have quite a lot going on and while we won’t plan any vacations, we’ll make sure we make time to attend events that celebrate our friends’ life milestones such as a new babies or weddings. We’ll have a new baby girl and hopefully a hole in the ground this spring. And maybe by the holiday season, we’ll be all settled in with our new home and mortgage payment!
As far as my personal 2024 goals, here’s what I have. I’m going to go into the why behind the goal and what I hope to accomplish with it. Then I’ll discuss all of the little subtasks or activities that help me achieve it!
Focus on my interior design passion: I love interior design and have so many things I want to do with this passion someday. However, as Dave Ramsey would say, if your business isn’t profitable, it’s just an expensive hobby. We must balance all of the things we want in life right now, and financial security + new house are near the top of that list! That said, there are things I can do to continue nurturing this interest of mine and keep it nice and toasty on the backburner.
- Render our existing house in SketchUp (I want the mental challenge of digitally renovating it before it’s torn down!)
- Render new house in Sketchup
- Do 5 Sketchup courses
- Renew Sketchup next November
- Reach 100 posts on the blog
Most importantly, I want to make sure I continue investing in my 3D design skillset through Sketchup because it does help us with our current house plans, will help us with future basement/reno plans, and is something I genuinely enjoy learning and doing. I also want to make sure that I stay in the habit of blogging, so I have a platform to share my design work someday. I’m hoping as our home build journey picks up, I’ll have more interior design posts to share. Until then, I can show my Sketchup work or focus on lifestyle/home goods posts!
Maintain a normal weight for optimal health: I put this goal on my 2024 list because I’ve felt all of the benefits of having a good weight and fitness level for the past few years, and it’s not something I want to give up! January 2020, I made it my goal to lose some weight gained during college and get fit. I was feeling good and about 10lbs down within a couple months, and then the pandemic actually helped me with my goal by forcing me to meal plan and ration my store pickup groceries instead of going out for snacks whenever I wanted. Later that year, I started doing Chloe Ting and started to love fitness! While my weight loss slowed down, I was getting more fit and was building muscle. My goal someday was to develop a natural identity of living a healthy lifestyle. In 2021, the world started opening up again as people got vaccinated, and I started dating my now husband then moved in with him. I wasn’t able to count calories as easily anymore just with our dinners and lunches being from scratch and portion sizes being harder to measure. With just naturally being more active taking care of a home, eating delicious meals we cooked together (that are usually healthy), and finding workout time as ‘me time’, I ended up 30lbs down from what I weighed when I first started my health/fitness journey. It’s so nice to feel confident, healthy, and fit! Plus, I accomplished my long term goal of making being healthy and active just part of my identity.
All that backstory leads me to the why behind my goal. Going through a long weight loss process or having to spend a bunch of time rebuilding my fitness levels is not something that I’m wanting to do again. While I am so lucky to have had an easy pregnancy so far, I do think that my general eating habits and activity levels have helped me feel so good! I want to make sure that I stay active during pregnancy and return to a healthy weight and fitness level post baby. It’s not just about staying active either, I can say from experience that I feel physically better when I’m at a good, healthy weight for my body.
- Gain healthy amount during pregnancy
- Stay active during and after pregnancy
- Return to pre-pregnancy weight
- Do one Chloe Ting challenge
So to accomplish this goal, I will need to gain a healthy amount during pregnancy. Every body and every pregnancy is different, so there’s no number here. I want to make sure that I don’t try to limit my intake or frequently overindulge. I’ll listen to my doctor in terms of whether my weight gain is in a healthy range. I’ll also make sure I’m prioritizing some physical activity about five times a week. Since the second trimester, this has looked like walking outside when the weather is nice or doing a 30 minute cardio/walking video from a prenatal Youtube channel. One time, I even counted the hour long grocery trip we had at Walmart as my activity because I was getting so tuckered out from walking and filling the cart! After the baby’s born (and I’m cleared to start being active again), I’ll probably start with this same exercise routine since it’s lower impact. That said, I do miss being able to do my higher intensity workouts! So by the end of 2024, I would like to see myself complete one Chloe Ting challenge. Finally, I would like to also return to my pre-pregnancy weight, that way I’m back at a good starting point for when we have another baby in the future.
Prioritize learning, presence, and keeping a well functioning home: This goal is a better way to say I don’t want to be on my phone all day or otherwise wasting my life away! There’s only so much time in the day, and I want to make time for the right things. I want to learn new things and be in the moment (even though my pregnant brain is constantly lagging or as the kids may say – has controller drift). I also want to make sure our home is easy to maintain and makes life easier and less stressful.
- Read 20 books
- Avoid Instagram and scrolling traps
- Create 10 new efficiencies around the house
With this goal, I would want to read another 20 books to keep new ideas and perspectives flowing. It’s an easy activity to put on your list that guarantees doing something productive. I’d also like to avoid Instagram and scrolling traps. I’ve been doing good and not looking at my personal Instagram, but I still want to maintain my design account/community. I’m going to subscribe to my favorite design accounts and only look at their new posts. With us being half way through the first month of the year already, I’m learning that although I have a lot of physical books right now to read, I need to keep one book on my phone or I will scroll Facebook or Google News mindlessly when I don’t have my book around. Finally, efficiencies! What does this mean? Well, I want to find those problem areas around the house that take up our time, money, or mental energy and fix them. So far we’re on track to accomplish our first one of 2024! We bought a small compost bin for the kitchen that not only reduces our trash waste, but also limits the steps we take in the kitchen. No more carrying the coffee filter across the kitchen to throw it away, our compost bin is nearby! Same goes with popcorn kernels in a bowl left by the sink, just dump them in. Our trash will be less gross and we get to feel good about composting. This also gives us a nice way to dispose of things that can feel wasteful when used often – like parchment paper. Just make sure that you get the kind that’s compostable!
Prioritize getting enough sleep and rest: There are no tasks associated with this goal because it’s pretty straightforward. I know what I should be doing to prioritize rest/sleep, I just have to do it. If it’s getting late and I’m wanting a snack while we watch TV, chances are I’m tired and we just need to go to bed (but me needing that snack is becoming more legit as I get further into my pregnancy!). Or if it’s early in the morning and I can’t fall asleep, I need to choose something like reading over further waking up my mind with the news or getting on my computer. With a baby on the way, it’s going to be so important that I take any opportunity I have for rest. Some might see this goal called out by someone pregnant with their first baby and think ‘just you wait’, but I don’t care. It’s a good reminder that if the baby is sleeping and I’m looking to rest, I should choose napping or reading (which if I’m tired, turns into a nap) instead of scrolling or watching reality TV. I can watch all the junk TV while the baby’s awake and needing fed or held!
I hope you enjoyed reading about my 2024 goals and maybe they gave you some ideas on how you can get the most out of your new year. I’d love to hear what goals you have planned or what you’re proud to have accomplished last year!
Thanks for reading!
Davien
-
2023 + overall favorite purchases/products!

Hello again and happy new year! I thought it’d be the perfect time to go over our all time favorite purchases of 2023. These are purchases that we have zero regrets with and would recommend to anyone. I’ll also throw in an overall award winning category with no year requirement!
2023 favorites
reusable zip lock bags

Amazon We bought these reusable zip lock bags to help transport muffins and sandwiches on road trips. We’ve also used them to store puppy chow and leftover holiday cookies/candy! The variety pack we got is the perfect amount of each size, with the gallon baggie being our most frequently used. They hand wash well and aren’t too big of a pain to dry. I feel like these will last a long time, and it’s nice to have one less thing to remember to buy or keep stocked. Now the only time we use a disposable zip lock bag is when we’re sending something like cookies home with someone else. We don’t do this very often, so I’m not sure it’s worth the hassle at this point to find an alternative. Overall, 10/10 purchase that we’re very happy with!
reusable grocery bags
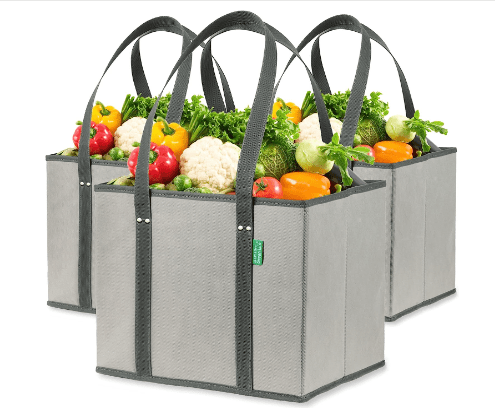
Amazon One of the worst things to have to bag at the grocery store is a large amount of cans! What do we buy the most of? Cans! Instead of divvying out cans across plastic bags to make sure we don’t overpack, we can just stack them all nicely in one of our strong, reusable bags. I also love not having to bother with trying to open a grocery bag that’s clung together when trying to get through self checkout.
The set of three bags is almost enough to hold our big load of groceries, but I don’t think you could go wrong with a set of six, so you don’t have to worry about leaving the house without all of your bags in the car. Plus, we also use these bags to corral some of our travel items, like water bottles, road trip snacks, books, etc.
Of course, we can’t ignore that these bags help out the environment by reducing our single use plastics. The only downside of reduced plastic bags in our household is not having free bags to use for cleaning the cat boxes!
le creuset casserole dish with lid

Crate and Barrel We love using this dish for our normal cooking and bringing a dish to a game watch or family get together. We’ve also had a few cases where we keep it in the fridge with our leftovers if there’s a little too much to put away into a smaller container. The top lid does wobble just a little, but it doesn’t bother me like I thought it would. I like that the lid itself is heavy, so you’d have to try to lose it.
I can’t ignore that this was an expensive purchase, but we don’t like to buy many repeat items, so we wanted something that would last for a long time. There are many options at better price points, but for us this was a pretty dish that we wanted to have and keep almost like an heirloom. The coating also makes it super easy to hand wash – which we’ll probably continue doing to help make it last a long longer even though it is dishwasher safe.
trivets

Amazon 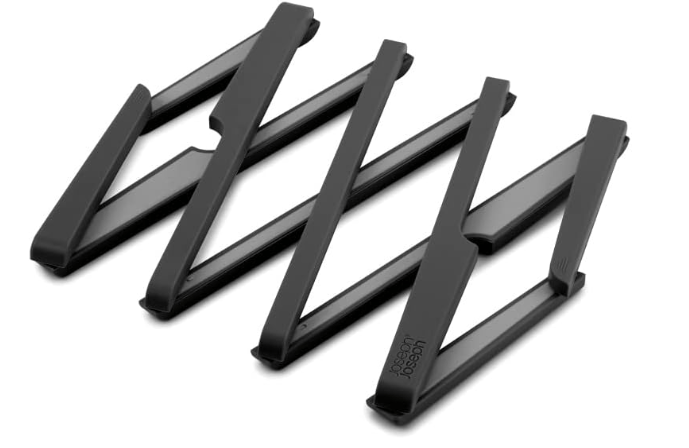
Amazon I’m not sure how we went so long without trivets! Not much to say here, except that these fold up small and are easy to store. We love them!
le creuset dutch oven

Crate and Barrel I never thought I would buy such an expensive piece of cookware! But this pot is great. It looks beautiful, and it will surely last a long time. It’s our go to when bringing potato or macaroni salad, and it keeps food at their temperature for longer. We’ve had a few cases where we needed two big pots, and in that case we love using a lightweight, inexpensive stainless steel pot as a secondary option (no way I’d be buying two of these!). Like our other Le Creuset dish, it cleans up very easily.
cloth napkins

Etsy We hardly buy paper towels anymore, and it feels so good! We started off our cloth napkin collection with two set of fours from The Lifestyled Co that is now out of stock, but we love this cocktail size napkin from Etsy. They’re the perfect size, especially when you eat a lot of meals at home throughout the day. Currently, Brandon and I are the only users of our napkins (how are the kids so clean?), so as we have more little kids or guests in the house, we’ll snag some more sets to build up a good supply.
Also, I really don’t mind washing or folding them since they take up so little space in the laundry. I imagine someday we’d have a cute little basket to just store these in and not even worry about folding them up in a drawer.
glass pyrex containers
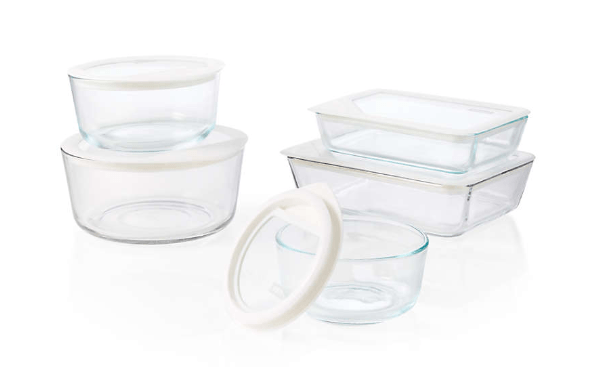
Crate and Barrel There’s not much to say about these containers except that they’re hands down, the best we’ve had! They look great, and we almost exclusively use these. We have 1-2 other small storage containers that we sometimes use, but otherwise this set of five has been the perfect size for us! It’s easy to keep track of the lids because they each have their own. I like how putting away leftovers is never an annoying process of trying to find the right size container and a lid that fits. This was totally worth the money!
beauty counter countercontrol regimen

BeautyCounter I’m still using this system, and I like it! When my stuff was stolen last fall, I tried using some cheaper alternatives while deciding if I was going to replace my expensive products. After a few weeks it was clear that my skin was not happy, and I went back to my previous products. While the best thing for my skin is being on birth control, these products at least get me to a state where nothing hurts and I can feel comfortable with foundation on. The biggest perk to this system is I don’t get into a cycle of wasting money with trying new products. I just stick to what works and repurchase as needed!
kitchenaid mixer
Target This mixer was a wedding gift from my mom and sister, and we LOVE it. We use it multiple times a week, and I think I’ve gotten my sister and dad hooked since they’ve since bought or received one, too. The key to getting your money’s worth out of a kitchenaid mixer is to store it on the counter. Don’t store it in a cabinet, don’t put it in the pantry, don’t cover it up with an appliance garage. If I had to go get this heavy thing every time I had an opportunity to use it, it’d collect dust. I’m not a big fan of having stuff on the counter, but this is one item where the counter is where it belongs!
We also love the mixing bowl. It’s a great size, cleans up so easily, and when you’re done with the mixer, just put the attachment and measuring cups/spoons in the bowl and fill with hot soapy water. A little mini sink for quick cleanup!
phase10

Target My family does not play games, but we’ll play this game! I love that it has instruction cards that you can look at, so it’s very easy to jump in and learn how to play.
essence blush

Target This blush made it to my favorites list because it is CHEAP and does exactly what it needs to do!
beis bags

BEIS 
BEIS I have a very detailed review post for these bags, but I had to include them in my 2023 favorites! The weekender bag is my go to bag for the small trips we take back home, and the dopp bag has a permanent spot on our vanity (for now, until it can fit in a drawer in the new house!). With the dopp bag, my side of the vanity has never stayed cleaner! I put away all of my items as I use them, and that is something to be celebrated.
overall favorites
My ring!!

I LOVE my wedding ring! I love having some sparkle even when the rest of me is looking bland. I realize that jewelry is not the place where I like to have variety, and what matters most is having pieces that don’t get tarnished/discolored and have a nice sparkle. For earrings, I almost exclusively wear the diamond hoops Brandon gave me for my birthday a few years ago, and they’ve held up beautifully. We have a lot of big goals coming up with building the new house, paying it off, finishing the basement, and then all of our bucket list goals like fixing up a house here in town or saving more for retirement. BUT somewhere in there, I’d like to get another nice piece of sparkly jewelry!
ipad/sketchup
I get SO much use out of my iPad. I had an iPad mini when I was in high school, but I didn’t get much use out of it. Two years ago, I treated myself to an iPad after our work bonuses came in, and I have zero regrets. I use it as a little portable screen for my workouts, which is so much faster than queuing up my videos on the TV. Plus, this allows me to mute my iPad and listen to my own music on my phone which makes workouts so much more enjoyable! I also use my iPad to display our recipes while we’re cooking, which is helpful when Brandon and I are working on different steps.
Finally, the main other use of my iPad is SketchUp! I was using SketchUp only on Brandon’s computer, but I stepped out of my comfort zone a couple months ago and got familiar with SketchUp for iPad. Now I can do designs or renders anywhere! This will make it so much easier to show our ideas to the builder or when we work with any of the tradespeople.
Lululemon leggings
I bought two pairs of lululemon align leggings five or six years ago, and a few years after that, bought another pair in a smaller size as I was getting more fit with Chloe Ting workouts. These past few weeks of pregnancy, my belly has grown rapidly and I’m amazed at how well these leggings have kept up after all these years! Besides the slightest pilling in the thighs, they look almost new. I don’t wear leggings often when not pregnant, but I would not hesitate to buy another pair in the future just knowing how long they last!!
I hope you enjoyed seeing all of our tried and true products. We really don’t buy things very often, so we put a lot of research and planning into our purchases!
Thanks for reading!
Davien
-
SketchUp 3D render: kids/guest bathroom

When we decided we’d be open to not finishing our basement right away, it meant that we’d have one non-primary bathroom to choose finishes for. One bathroom for the next few years for our kids and guests. That’s no different than we have today, but it does make me want to be intentional with our selections!
The layout
Now, this bathroom is currently laid out with a tub/shower, toilet, and 36″ vanity. Don’t ask me what the little dry walled off section is next to the shower. We wanted the bathroom to be this width, and it created a little extra space on the shower end. I wouldn’t want such a narrow, deep shelf or closet in this bathroom, but if we don’t need it for plumbing or structural purposes, I’d be interested in making a built in bookshelf for the hallway. It’d be a great place to store books being so close to the living room, especially since our living room doesn’t have much space for furniture besides seating. It also allows guests a chance to see our books instead of them being hidden in our office.

For the tub, we’re thinking of just having a classic shower surround with a shower curtain. I personally think tiled showers while beautiful, are more maintenance, so it makes more sense to just use a a standard shower tub surround in this bathroom. While we won’t get to pick out tile here, we can look for a beautiful shower curtain to fit the space!
This bathroom’s footprint is relatively small at about 36 square feet (6′ x 6′ when excluding the shower space). The tile I’m interested in is a little pricier at $17/square foot, but the small square footage of this room makes the cost more palatable.

Tilebar The vanity
Now here’s where things get a little more expensive. I love the idea of incorporating a statement marble with our vanity, and I thought this room would be the perfect place to use a remnant slab since we’d just need one that’s 36″ wide. However, I was browsing online slab yards in the bigger cities near us, and I just don’t think we’ll see the stones I’m looking for. I decided to see what Etsy has, and while I didn’t find many vanity tops for undermount sinks, I found a ton of pure marble vessel sinks or wall mounted vanities! I l love the idea of using a wall mounted vanity in a future power bathroom (whether in our basement, down the road reno house, or dream cottage!), but I would want some cabinetry in this bathroom to store towels, q-tips, toothbrushes, etc.
We then decided that a reasonable approach may be telling the builder to not write in the cost of a guest bathroom vanity and instead, customize our own! It would be a new experience that has lots of room for mistakes, but what a fun project this could be. Here’s a to scale render of what this custom vanity could look like.
The star of the show is obviously the vessel sink. It was so hard to pick just one off of Etsy, but here’s an example of the shape/dimension of sink I liked and used in my render:

Etsy I loved the lower height on this one, but our kids/guest bathroom would be a great opportunity to use a darker Calacatta viola marble. The Etsy store lets you customize the sinks, so I would probably go with a similar marble to what’s seen in another of their sink listings:

Etsy With this being a high traffic bathroom, I like the idea of using a raised marble sink that discourages things being left on it. The most we’d have to worry about is globs of toothpaste being left in the bowl, but this is the perfect opportunity to teach kids to clean up after themselves anyway.
As far as vanities, I found this one from Wayfair that is *perfect*. I love the color, the little knobs, and the detailing on the doors and drawers. I especially like how the inside is pretty open, which makes it a good place to store more towels or toothbrushes out of sight. One slight concern with this vanity is it’s 33″ tall, and it’ll have additional height with a countertop and vessel sink on top of it. The base of this vanity however create a perfect little nook for a small step stool to make hand washing easier for smaller kids.

Wayfair We’d of course still need a vanity top for the vessel sink to rest on. I rendered the vanity with a Carrara marble, which is surprisingly a cost effective solution, especially if you find a remnant. I’m very flexible on what this material would be, and I think it would be best to wait to decide until after we got the vessel sink, so we could also compare samples of laminate, solid surface, or quartz.
Overall, I think the best approach for this custom vanity project (if we take it on) would be to order the sink from Etsy first since it really sets the tone for the whole piece. Then buy the vanity when it’s on sale, especially since Wayfair shipping should be relatively quick. Finally, once we have the sink and the vanity, we can look at countertop samples to see what would look best. This would be the one area where we’d work with a countertop shop or big box store, so the bulk of the project could be done on our own timeline. I have faith that Brandon would be able to handle the assembly of all the vanity pieces, and then it’d just be him or the builder doing the actual installation in the new house!
Finally to wrap things up, here’s an example of a marble vessel sink vibe in this bathroom from the #JoshuaTreeCustomBuild project by THELIFESTYLEDCO.

THELIFESTYLEDCO Previously I always added in a disclaimer to all of my renders and designs that the floor plan had not been approved and things might change. However, it seems that our builder feels pretty solid about our floor plan if they’ve been having someone draw it up and get estimates off of it! Now, it all comes down to what we can afford to do. If you read our first real builder update, we find it very important to stay within our target budget, and will make sacrifices to do so. Design is something I love to do, and we aren’t afraid to do (hired if necessary) projects down the road. If it were any different, we wouldn’t have spent years working on our floor plan, wandering Floor & Decor, and learning how to 3D render.
We’re so, so excited for all of the new experiences next year. It’s crazy to think that we will be building soon based on how fast things are moving with the builder, and our little baby will either be here just before or just after we break ground!
Thanks for reading!
Davien
-
It’s happening – our first real builder update!
After years of waiting and planning, the time has finally come to work with the builder! We met with them November 29th, and we’ve already received preliminary plans from their draftsperson. It was crazy to see the plans we dreamed up laid out in a professional way with technical information such as a door/window schedule. So far the builder has mentioned that with the high end aesthetic we show in our inspiration pictures/renders, we may be landing in the 20-40% over budget range. LOL! I’m not too surprised because we have been dreaming big!
Our first task was to take a look at the preliminary plans and see what changes we’d make. The main floor was pretty spot on with just a few changes, which was very impressive considering how well they were able to match my SketchUp render in a short period of time. All changes were pretty minor, with the main comments just being around door placement, guest bathroom configuration, and adding windows to the primary bath. Due to not knowing how the main floor would pan out (we have no credentials in this field), we held off on giving any input on the lower level/basement in case there were drastic changes with the size or shape of the house’s footprint. The draftsperson ran with the basement design giving it a nice wet bar, one and a half bathrooms, and two big bedrooms. While this looked awesome and would work nice for someone else, we weren’t looking for as much recreational space down there, so we did send back revisions asking for more bedrooms and removing the wet bar.
Last week, the weather was great, so we were able to go on a walk to think through the house and noodle on how we’d tackle the higher estimate and prioritize what’s important to us. We brought up the idea of finishing the basement at a later time to help keep costs down. The boys would go back to sharing a bedroom (in our would be fitness room) and the baby would have her own nursery. We’d still find a way to create a hangout downstairs for the boys and their friends since we need a living room TV that doesn’t know what YouTube is. The boys and our baby would have a full bathroom right by their rooms, so it’d already be an upgrade from our current home where everyone shares a shower.
Overall this decision has so many benefits. For one, it would definitely move us closer to our budget which lines us up to pay off the house within four years of finishing the build. It allows us to focus on just furnishing a couple spaces in the main level like the living and dining room versus worrying about buying more bed frames/mattresses for additional bedrooms. Once we have the new house paid off, we can work to save cash for our basement and finish it in phases as we fund the next steps. Finally, it allows us to really slow down on the design for the lower level and make it something we love instead of only thinking of cost saving options. With it being a few years away, it’ll be fun to have another area of our home I can experiment with as I learn and grow in my interior design hobby.
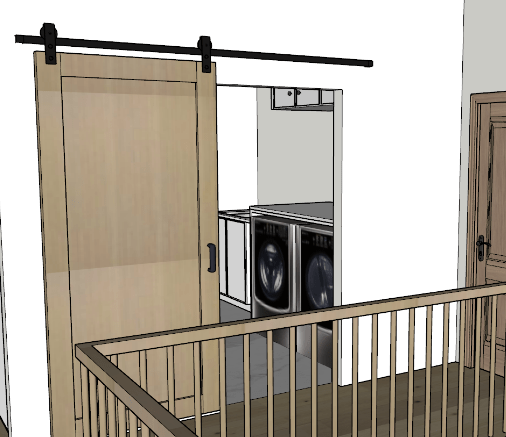
Now, our basement is going to be our main area where we cut costs. We’ve also decided that while most areas of the main floor we want to get right at build time, we are totally fine just putting a utility sink, washer, and dryer in the laundry room. That will be more than enough to get us by for a few years, and if we really don’t like it, we could save up on the side and prioritize a laundry room upgrade before the basement. We also added a revision to the preliminary plans to exclude mudroom cabinetry/lockers as we’ll just use coat hooks and a bench until we decide otherwise.
I’ll reiterate that we’re still waiting on the real estimate which will then need more detail to become actual hard set costs, but I feel so much better about our home design now that we’ve made some decisions on how to keep our dream home from hindering our other goals. While we’re so excited to build this home, we want to make sure it never gets taken away by building it within our budget and working to own it outright as soon as we can. We want to try renovating homes in a way that improves our community by just sprucing up the houses and makes them not only the affordable option, but a house you’re excited to move into! Someday I’d also love to build a small cottage that can be used for rental, my own family visiting, or even a romantic getaway. If I didn’t have all those other things I wanted to do, it’d definitely make it difficult to keep our budget front of mind while designing/building our dream house!
It felt so good to finally have a builder update! We anticipate having many more updates in the months to follow, and I’m looking forward to sharing the process of working with a custom home builder!
Thanks for reading!
Davien
-
Subscribe
Subscribed
Already have a WordPress.com account? Log in now.
