-
Refining areas of our dream home design!

We meet with the builder next week!! It’s been a year and a half since we last met with them, and we’ll finally go over our design and work on getting estimates so we can start building next year. We’re so excited! We think our plan is perfect, and it’s just a matter of making sure that what we’d like to build can be built and within our budget.
To help prepare, I’ve been working on gathering a list of all the materials we plan on using, details that we don’t want to miss, and I’ve also been ironing out those last fuzzy parts of our design. I’ve been regularly using my Sketchup again, and we actually got the design hooked up to the VR headsets, too. I absolutely loved walking through the design as if it were real, and there wasn’t a single thing that I wanted to change. (Besides re-rendering our stairs/basement – which we’ll do once we get the main floor approved!)
Now I’ll go ahead and show the five design elements that we’ve either firmed up or changed!
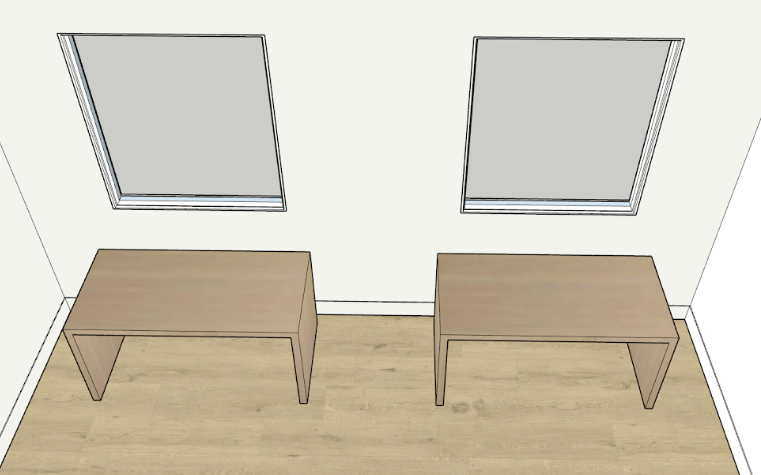
Patio door and window in living room –> two French doors

If you remember, we planned on having a symmetrical window and patio door in our living room flanking the fireplace. One thing we weren’t sure about was the price of a window that would be the size of a door, and we also weren’t sure if it made sense to make a fixed window go down to the floor.
While researching ideas on how we can make this a straightforward idea for the builder, I stumbled upon French doors that flank the fireplace. I really liked the idea, but we didn’t have room for double doors. Turns out, French doors don’t have to be doubles, they can be singles too! The great thing about having two patio/French doors is that we can switch up the furniture without worrying about closing off a route outside. If we go with outswing doors, we can try out a retractable screen and have both open in the summer without taking up interior space. Now while I like that idea, one thing I worry about is what if we need to quickly close our doors in case of an emergency like wandering bears or an intruder! We’d have to open the screen and pull the door in instead of just closing the door. I’ll have to think about it, but that risk is very low for all the pros we’d be getting.
Overall, we feel very good about having two doors in our living room. It’s much easier to estimate the cost of two patio doors than the price of one custom window that’s just made to look similar to a door. Plus, they’ll match!
Marble transition to primary suite

Tilebar I loved this marble mosaic and was planning on using it for the office fireplace hearth. However, we found a gorgeous fluted marble for the office that looked so good next to the wood floor, that we decided to make that fireplace gas so it wouldn’t need a hearth. Plus, it was so pretty on its own, we didn’t want it competing with another material.

Tilebar Here’s a render, but my sample is so much more beautiful in person.
My problem then was where do we use the pretty mosaic?! Well, that too looked so good next to the wood floor that we decided to see how it’d look as a threshold between the guest hallway and primary suite door! You’d just get a hint of it with the pocket door closed, and it’d look so pretty for those times the door is open.


What I love about custom designs like this is that they’re cheap in comparison to what you’re getting! This would require very little material and the labor shouldn’t be outrageous. Overall, you’re probably looking at $500 max for a fun customization like this.
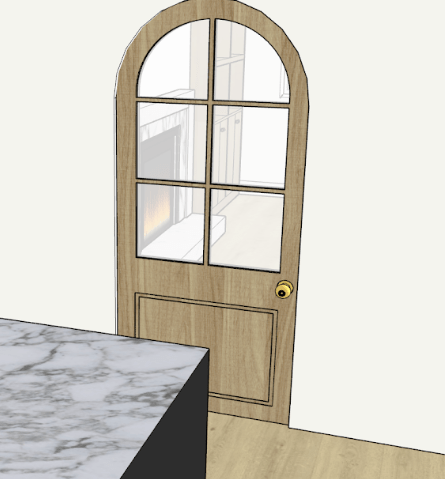
Brick transition to mudroom, wood floor in mudroom
As you know, I had my eye on some UK sandstone that looked antique. It wouldn’t be that expensive really for such a small space, but I kept going back and forth on it due to the burden of importing it across seas (who even am I!).
I had seen a similar-ish tile at Floor and Decor which was actually a creamy marble with tumbled edges. We picked up a sample last time we were there, and let me tell you, it’s so soft! I couldn’t stop feeling it! While we love how soft the marble is and how accessible it’d be, I just wasn’t sold on the scale of 3″x6″ tiles for our mudroom. It’s a small space, but I didn’t want a lot of grout lines or cracks that you’d step on.

Floor and Decor While I thought I must have the look of beautiful European stone floors, I didn’t necessarily need them to be in this house. What’s been helping me put a pause on needing to do certain things in our forever home is the thought of doing them in a reno or a small cottage. What if our future cottage has sandstone or limestone flooring? With that in mind, I was happily able to decide to just put our same main flooring in the mudroom too. However, I still wanted to use that super soft limestone look marble!
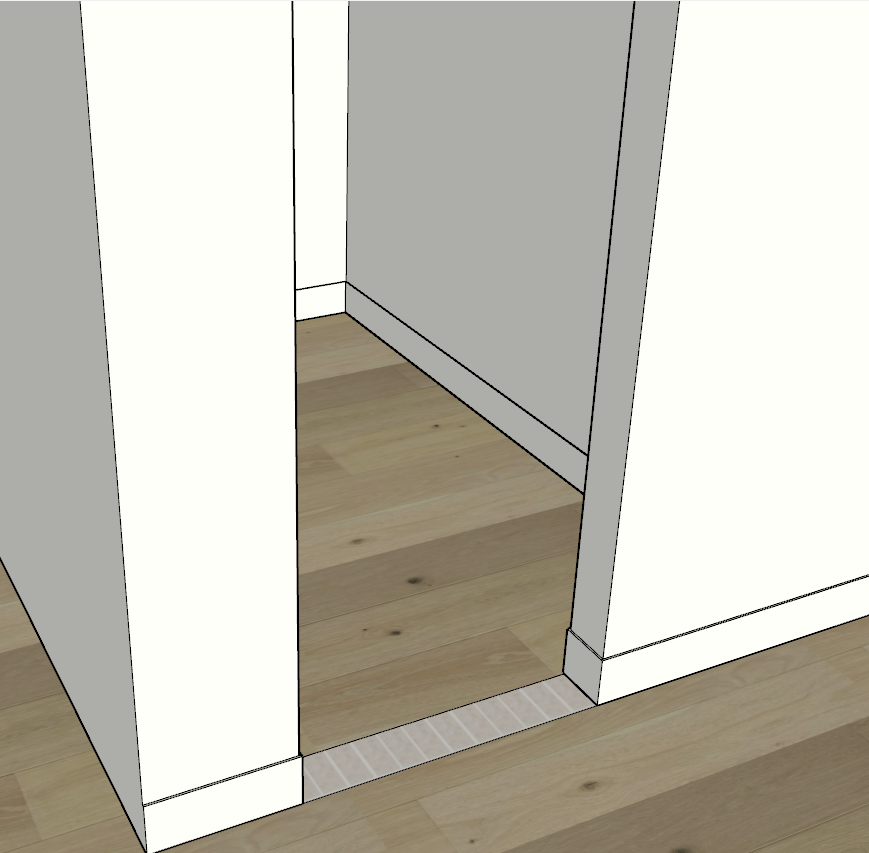
Well, I remember seeing in the #PVVistaBuild by TheLifestyledCo that they put bricks over thresholds and it turned out so nice.
TheLifestyledCo I then rendered these marble 3″x6″s and loved the subtle look of a “brick” threshold offering just the slightest change between the entry and mudroom. I was worried about the office door not looking symmetrical with the mudroom door, but their walls are already a little different with the entry having a built in console and lighting.
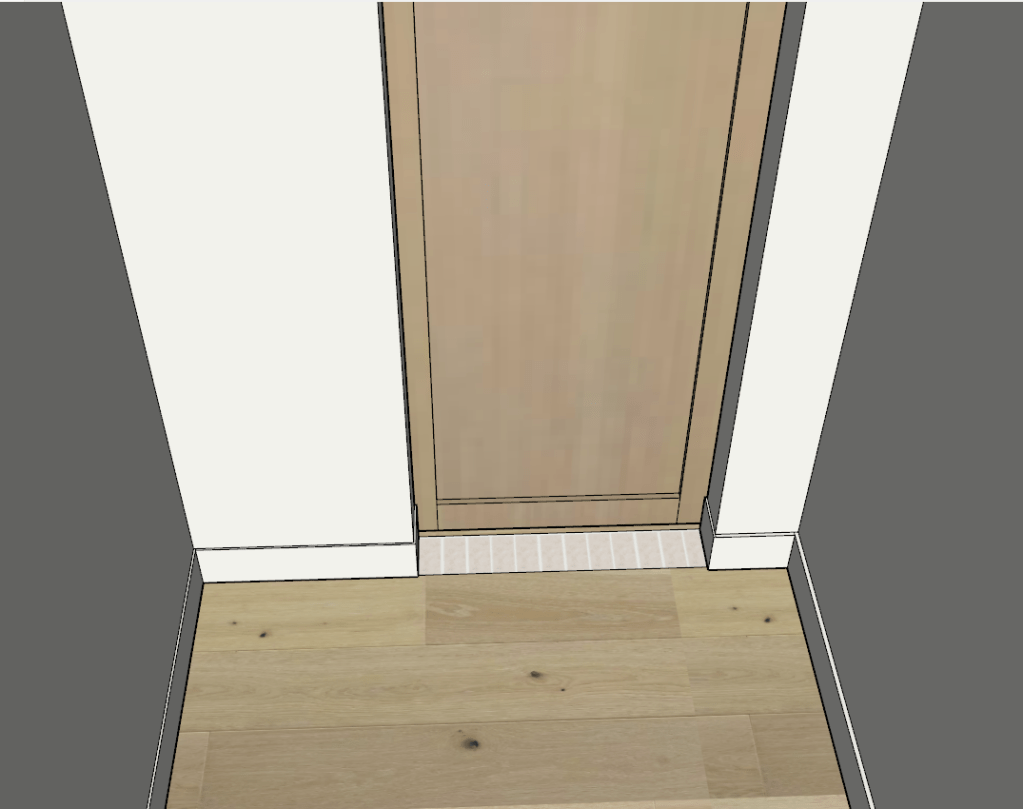
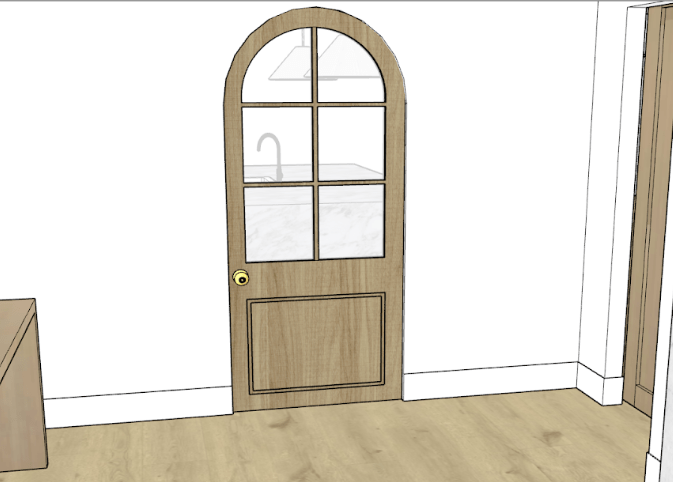
Here’s how it would look with the door open (well, hidden LOL). I just love how subtle it is, and it signals the mudroom as a separate space from the rest of the main floor, just like the primary suite threshold does (Brandon noted this!).
Beams, tray ceiling in living room
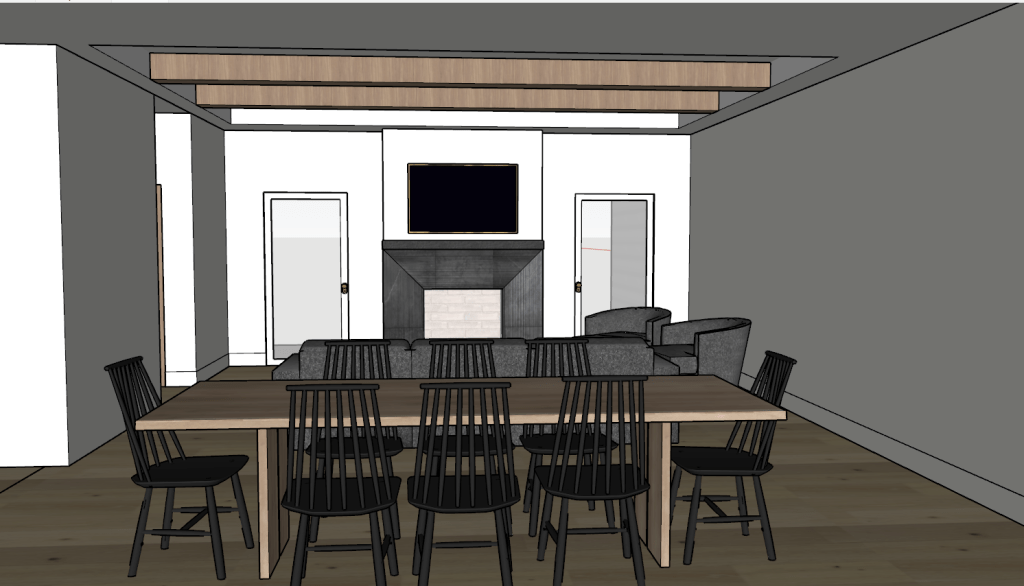
I’d been debating on whether we add a tray ceiling in the living room to give a light fixture more space to hang and not block the tv. When I finally rendered it, I loved the look!! I loved how it took a long open living space and broke it up visually. With such an expanse of white walls, I also felt that we needed a little more warmth in the living room, especially with the dark fireplace and likely dark furniture. When I rendered beams in the tray, it seemed like the wood tone versus white really did a lot for the space. The beams also drew attention to the shift in ceiling.
Rendering different light fixtures to scale did help us decide that a hanging light fixture would just be too low to not risk blocking our view of the tv. I think we’ll most likely just do recessed lighting in that room (our current living room has 0 lights! No cans, no fan, not even a boob light!) for when we need extra light for puzzles or games. I’m still up in the air with a ceiling fan, so far we’ve managed without pretty well and it does mean one less thing to dust.
Pendants over the dining table
We’d previously had a more linear chandelier rendered above our dining room table, but I just didn’t like how it blocked the view of the TV from the kitchen. I don’t think we’d get much value out of seeing the TV from the kitchen, but it was more about the silliness of building in a blocked sight line.
Since I’d finally taken a stab at rendering our kitchen pendants to scale, I found that three looked best. With three little pendants above our island, I thought hey, why not try out two of a bigger pendant for our table? They wouldn’t overlap visually, and it might actually give a better view of the living room focal point.
It worked, and I love it! Visually there’s no crowding. I actually rendered this pendant to the best of my ability, and would love to actually get a pair for the new house:

Studio McGee Those have been all of our recent design changes/clean ups! We are so, so, so excited to meet with the builder. I’m also a little bit nervous! I told Brandon I’m more nervous about how the builder meeting will go than my own labor/delivery next spring! I think a lot of my nerves come from the fact that I’ve never designed a house, so I have no idea what to expect in terms of price or what is feasible. I’ve done a ton of research, but that can only get you so far. When I look at new houses on Zillow, it’s hard to translate price differences when there’s no design like ours and we already have our land paid off.
Either way, we’ll sit tight for that first design meeting, and I can’t wait to update you with how our builder meeting goes!
Thanks for reading!
Davien
-
2023 fall favorites!

I’m already living the Christmas vibes, so it should be no surprise that I’m rounding up my fall favorites in early November! I haven’t done much shopping in the last couple months, so quite a few of my favorites are budget-friendly or free!
Limiting non-productive scrolling
I’m not sure when I tried limiting my scrolling, but it’s been at least a week since I stopped scrolling both in Instagram and in the Baby Center community channels. The main use of both was to pass time or get some entertainment (I mainly read the drama posts on Baby Center). While I’m not sure what my intention was for that day I stopped scrolling, I can say that I’ve found so many benefits.
First and foremost, I have so much time! Over lunch, I get a lot of cleaning done instead of just mindlessly scrolling. In the afternoons, I’ve been blogging, walking, rendering in Sketchup, reading, or playing free cell (critical thinking!!). I also find that I’m much more motivated when wasting my time isn’t an option. Sure there are times where I watch a lot of TV, but if I’m not scrolling while doing it, I don’t tend to zone out as much.
I also find that I have more energy by using my time more wisely. I’m less likely to stay up later than I should and can usually muster up some motivation for starting my workouts. The errands/chores I get done over lunch help me go back to work feeling recharged!
Workouts from Pregnancy and Postpartum TV
I was a big Chloe Ting fan before this pregnancy and up until around 14 weeks. After that, the movements just got a little more tricky with my abdominal obstacle. My main form of workouts has been with Pregnancy and Postpartum TV on Youtube. I love how the workouts will last through the next stages my body will go through without additional modifications or workout programs. Before this, I was looking at spending $15/month on a prenatal workout program, so I love this free option!
My favorite videos from the channel so far are those that are 30 minutes and include warmup/cooldown. I find that it’s much easier for me to do my workout nowadays when I know the total commitment is 30 or 45 minutes max (when including time to get dressed before and after). This video is a little heavier with the cardio and perfect when I want to sweat and get my heart rate up. This other video is great for less cardio and more full body strength exercises. I’m looking forward to trying more of her workouts during the next couple months!
Noracooks ranch dressing

Noracooks A few weeks ago, I ate at Des Fresh (an all vegan restaurant in Des Moines) and surprised myself by saying I wanted a side salad instead of fries! While I want to eat salad, I have to have a good dressing or I just have zero appetite for it. If I buy a bad salad dressing or try one that is too complicated to make, it puts me off salad for months!
That said, since I’m pregnant, I do try to give the baby some greens here and there. The ranch dressing used at Des Fresh was absolutely delicious, and I was determined to make my own after not finding any dairy-free ranch at our nearby Walmart. This recipe by Noracooks was delicious, but that’s not surprising considering most of our meals are from her website! For the recipe, I used the vegan mayo substitution since I think cashews are expensive, hard to find, and just plain fussy. The end result had the perfect tang and one batch of it got us through at least 6 good sized salads! Not bad at all!
CharleyCharlesHome Shop on Etsy
I found this Etsy shop while looking for more napkins that are a smaller size like our current ones. Ours are 8″x8″ and these are 7″x7″, which I guess is a cocktail napkin size. I like how they’re about the size of a paper napkin or paper towel versus a big cloth napkin you may find at a restaurant. Those are great when you need to cover your lap, but around here we just use napkins for our hands and face.

Etsy I got a 4 pack of the 7″x7″ napkins in the color spice. I love how soft and sturdy they are. Plus, being an inch shorter on each side compared to our other cloth set, they fold up into the cutest little square! We used them for the first time earlier this week, and they were perfect. I could definitely see us getting some more down the road, but it’ll be hard to pick which color! One thing to note is that the price per napkin definitely goes down as you order a higher quantity.
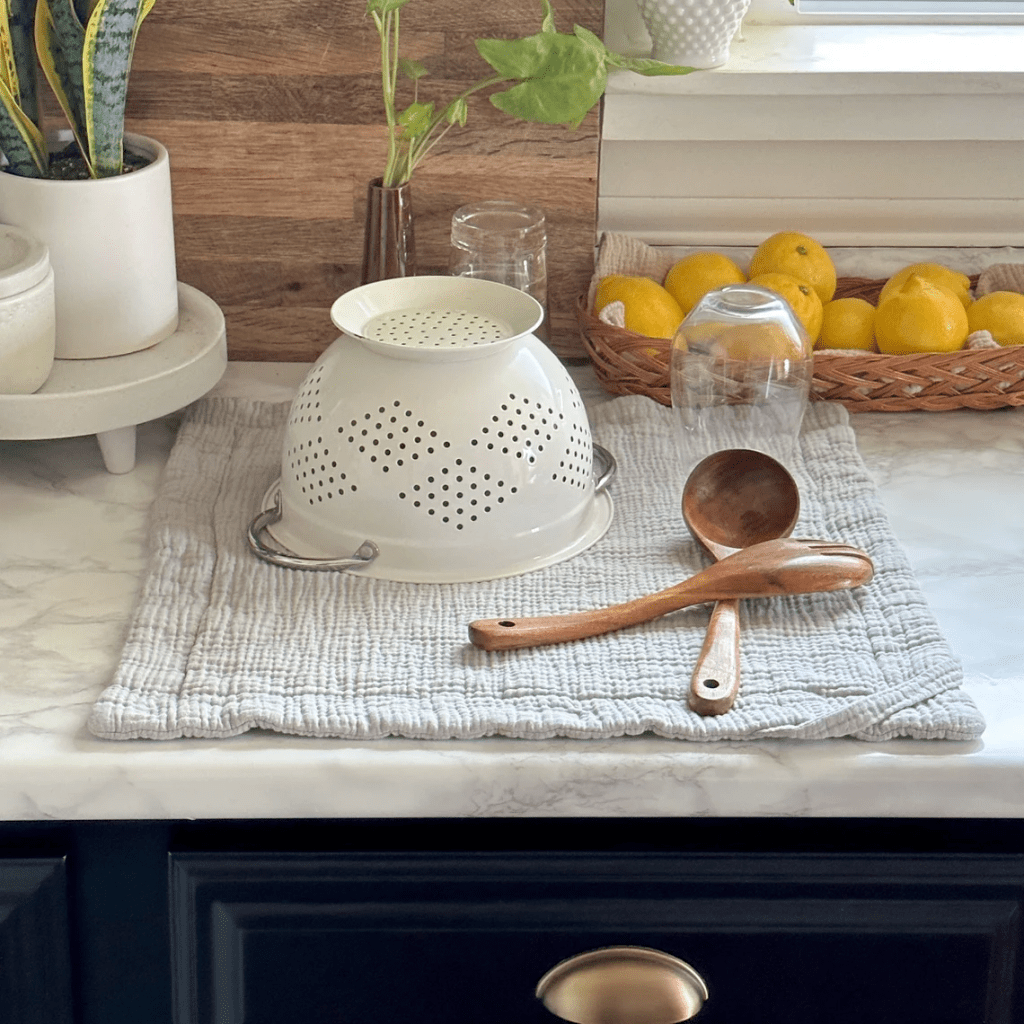
Etsy When I lived in my apartment, I used a placemat for a dish mat mainly because it was a fun silver snowflake design. It was awful for absorbing water, but we kept putting off buying a legit dish mat after I moved in. (That said, Brandon probably had a dish mat with good absorbency, and I probably threw it out because mine was cuter). Well, at the same shop as the cloth napkins, I found a dish mat with great reviews! It’s so thick and has a loop if you want to let it hang dry after use. So far it’s kept water off the counter very well, and we let it hang dry from an upper cabinet above the sink. We ordered it in the light gray color, and it’s so pretty.
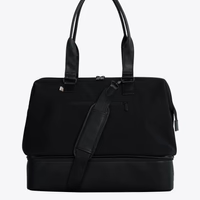
BEIS Dopp bag
I recently posted a review of my BEIS bags, but I also had to include my Dopp bag on my fall favorites! I love how my side of the countertop looks so clean all the time because my bag can house all my skincare products, deodorant, scrunchies, nail clippers, tweezers, etc without taking up a lot of space or even needing to zip/unzip compartments. I’m so happy I got it! I was planning on pestering Brandon to buy one for his stuff, but we’re getting him Lasik and that eliminates 99% of his products he’d need to store!
Apple juice
I’m not sure why apple juice needs to be a fall favorite, but it’s the perfect beverage when I want a little treat. I make sure to get the juice that has no added sugar and limit myself to just one serving. It’s super refreshing and has your daily amount of Vitamin C! There really are worse things you can be drinking, and it’s nice to have an easy non-alcoholic beverage when you’re pregnant!
I hope you liked this hodge podge of fall favorites! The theme this season was definitely budget-friendly and/or free favorites, and it’s such a nice switch up from pricey purchases!
Thanks for reading!
Davien
-
BEIS Weekender and Dopp Kit Review

There is nothing more satisfying when buying something new than when your purchase lives up to its expectations! I wanted to give these two bags from BEIS a review since it’s a brand heavily promoted on Instagram, and we’re all out here trying to not get influenced in the wrong direction.
I will start with my Dopp Kit since I use that daily now!

BEIS I thought I’d use this bag just for travel, but I honestly keep it on the counter at all times! In this bag, I keep my 5 full size Beauty Counter products (moisturizer, face wash, all over treatment, toner, and spot treatment), full size makeup remover, deodorant, and a scrunchie. I love how everything is in one spot, and I keep this bag unzipped and open for easy access.
When it came time to pack for our family reunion trip, I was able to have the majority of my hygiene items packed in this bag. In the bottom compartment, I just put travel sizes of shampoo, conditioner, body wash, and a 3-1 for Brandon and the boys. I was also able to fit my brush and comb. That bottom compartment is seriously so handy because I can always keep those travel sized items packed! Plus there is so much room it’s crazy. In the open compartment, the only additional items I packed for the trip were my retainers case and toothbrush/toothpaste.
Overall, I love this bag! It’s fairly large, but it makes packing super quick and easy. In the new house, I think I would try to have a deeper drawer that can hold this bag open or store it in a tall cabinet.
BEIS Now for the weekender bag! This one gets less daily use, since it really is just for travel. In this bag, I was able to pack pajamas, an outfit for the next day, and a sweatshirt for clothes. I kept a second pair of shoes (my croc sandals!) in the zippered bottom. I also had prenatals, a straightener, my dopp kit, a small makeup bag, and phone charger. It really is the perfect size for 1-2 nights away. Any more than that, and I think you’d either need to leave the dopp kit at home (it’s pretty large) or pick an actual suitcase.
For how heavy the bag was with everything packed, it was very comfortable to carry with the two handle straps or the larger cross body one. One thing I definitely took advantage of was the zippered bottom. When we were packing back up to go home, I put all of my used clothes in the bottom with my extra shoes. Finally, I loved how the opening of the bag can stay propped open like a tote which makes it easy to just toss your items back in your bag throughout your stay.
Overall, I love the bags I bought! I try to buy long lasting, quality items (still at a decent price point) and in my mind, this brand fits the bill. I’ve already mentioned that I have the makeup bag on my wish list, but for how little makeup I currently have (thanks to some getting stolen..), I feel good about pushing that one off a while longer. My work bag is so overdue for replacement since the inner pockets have holes and the strap digs into my shoulder, but for how little we go into the office now (and we’ll go even less once the baby’s here), we’ve decided to prioritize Lasik for Brandon instead!
Thanks for reading!
Davien -
Sketchup 3D renders: fireplaces and vanities
This past week I’ve made it my goal to get back to using Sketchup because we should be meeting with the builder this month! We reread our email, and they did say early November, so it could be any day now… Plus, this software is over $300 each year, so I better make sure I’m using it!
I love to use Sketchup to try out different finish ideas, especially since I learned how to import my own materials from real stores like Tilebar, Floor and Decor, etc. It makes it easier to see how different materials will work together in your design. I also love to use Sketchup to just scratch the itch of building custom pieces. If this house were a one and done and the last house I’d design, I’d be so sad because I really enjoy playing around with different looks! But I know we’ll always have a project on our mind whether it be in our dream house, during my bucket list goal to flip a house, or when we build our small house on a hill that can be a luxe getaway cabin (dream big!).
Either way, today I have two fireplace renders, a tiny entryway render update, and two vanities to share with you. Let’s get to it!
Potential living room fireplace
I’m trying to prepare as much as possible for our build since it could be starting before our baby is born and our baby is due in less than 5 months! What!! I feel like we’re asking for a lot of space for our budget, but it’s also so hard to compare because we’re in small town Iowa and own our land. There’s not really much I can do to prepare for the square footage cost conversation, but I can take a look at those pieces of our house that were tagged ‘do later if too expensive’ and refine those budget-friendly options a bit.
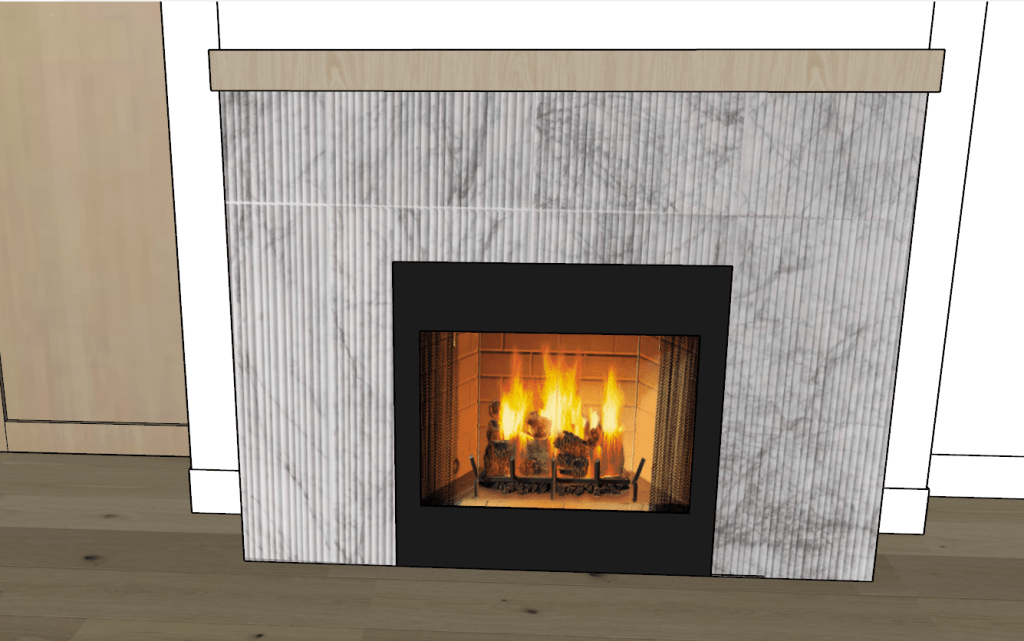
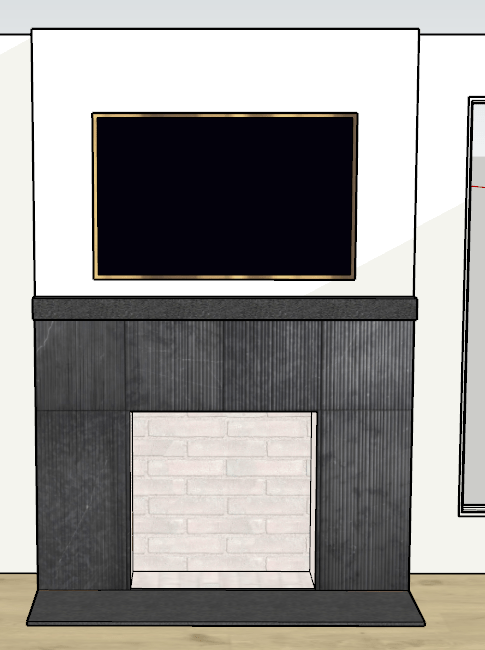
As you may know from our other posts, we wanted a slab fireplace, think dramatic marble veining and thick stone. Sounds expensive right? I know! But we didn’t think we’d be able to do that in our initial build or even the first five years. So what do we do in the meantime? Well, Brandon wants a wood burning fireplace (so no glass) but hooked up for gas in case we want to use that later on. This means we need to have fire/heat/ash safe materials around the fire box. So just having drywall around the box was out. If we were going to have to tile the surround and hearth, we didn’t want it to be something we didn’t like for the next 5-10 years. This led me to Tilebar!

Tilebar I’m a sucker for fluted or reeded marble, just check out my blog’s name! I never thought I’d have a good use case for this expensive tile, but a fireplace is the perfect application because you really don’t need much material. This tile is $30 per square foot and 12″x24″, and our rendered fireplace is 5’x4’6″ with a 3’x’3′ box. With just tiling the face, we’re looking at 13.5 square feet for the sides and 4.5 square feet for the top. Total this is 18 square feet, add 10% for waste and you’ve got about 20 square feet, which times cost per square foot, you’re at $600 for tile surround cost. Now that’s much better than the cost you’d pay on a slab! Installing tile is also much less expensive than fabricating and installing stone slabs.

Floor and Decor This tile is $7.30 per square foot (or $19.49 per piece) and would be along the hearth. The tile comes in 24″x16″, which is perfect for the 16″ width of the hearth. You’d need three tiles so a total tile cost of $60 for the hearth. If you combine the hearth and surround, you have a total of $660. Not bad at all!

Wayfair As far as the mantel goes, we’re not totally sure what we’d like. I think we’d both be happy with a charred or black stained wood. We weren’t planning on going so dark overall with the fireplace until we realized we needed to balance the black in the kitchen. Overall, I’m very happy with this fireplace look and if we did it, it’s possible we’d keep this look for many years to come.
Potential office fireplace
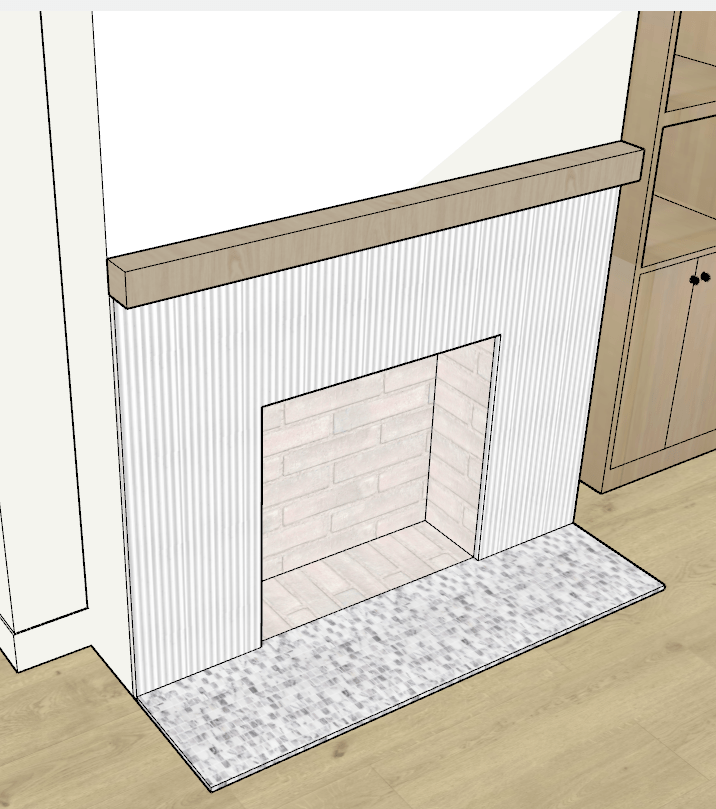
For our office fireplace, we were also itching for a slab marble look. Because this and the living room fireplace were planned to be similar, I just darkened the theme when finding some ideas for the surround and hearth.

Tilebar This tile is $8 per square foot and 12″x36″. With the same fireplace dimensions as the living room, we’d be looking at 20 total square feet again for the surround. This tile has about 14 square feet per box, so we’d have to get two boxes for a total of $228. Not bad at all!
Tilebar This tile is so fun! It’s the priciest of the bunch at $32.50 per square foot. It comes in 1 square foot sheets, and while we just need 8 sheets (6’x16″), I’d round up to 10 just to make sure we get all that we need. This totals to $325 of hearth tile. Total for this fireplace would be $553 in tile costs!
My favorite part of this fireplace look is that it’s a Brandon approved recreation of one of my favorite (but there’s so many!) The Lifestyled Co designs I highlight in this post. I LOVE the shower with the white ribbed tile and checkered floor!
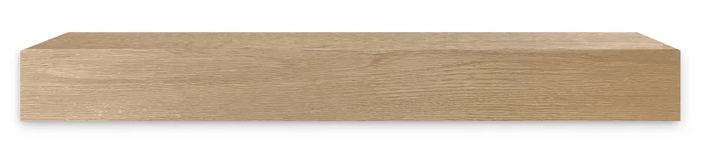
Etsy Finally for this fireplace, we’d just do a light oak mantel to keep it simple. I’m not sure where we’d buy one, but I linked this one from Etsy just to show the vibe!
Potential entry shelf
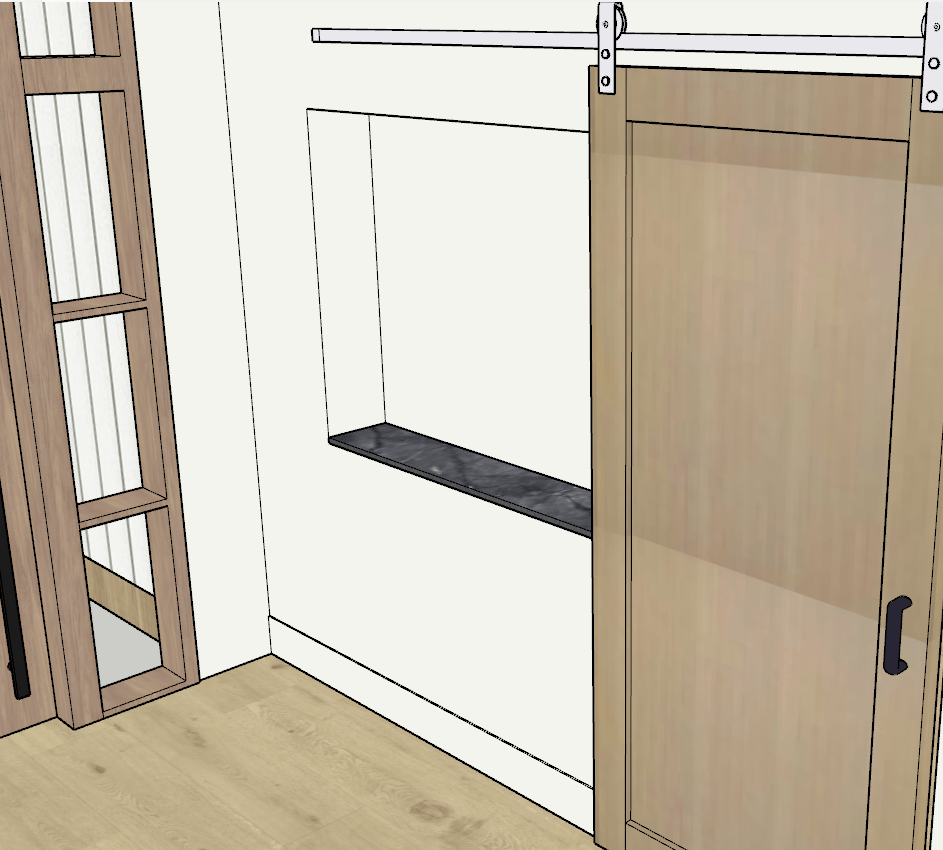
Another piece of our home design that had a ‘splurge or save’ selection was our entry way shelf. For splurge, we were thinking viola calcatta marble, but that was only going to be feasible if we found a remnant or had a leftover piece. Either way, it seemed like I should find a good alternative that we can just know works and is in budget.

Floor and Decor Laminate seemed like a good option, but I didn’t want a countertop thickness or to have to buy sheeting + plywood for just a small section. What ended up being the perfect option was this 48″ long tile we could just cut to the right width (maybe 9 inches?). This tile is less than $40 for the whole piece and with Floor and Decor, you can return any unused material within 90 days (if we had to buy a whole box).
This material is what’s plugged in my entryway shelf render now, and I think it fits perfectly!
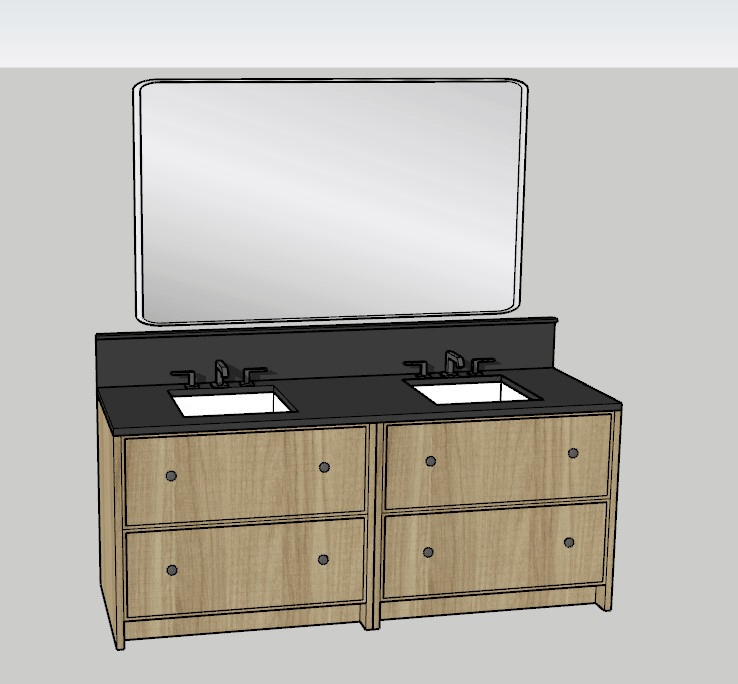
Just for fun: double vanity
Just for fun: single vanity
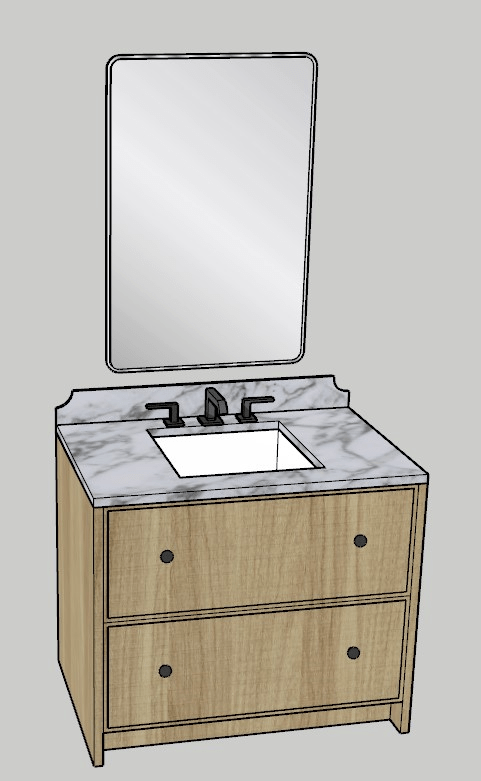
My *dream* is to custom design a bathroom vanity someday! However, I have really warmed up to prefab vanities for all non primary bathrooms. I know I seemed to state this as an option before, but it really wasn’t something I wanted to do until I realized I could circle back in 10-15 years and have the time of my life going the custom route. If I got started on picking the cabinetry and countertops for a secondary bathroom’s vanity now, I wouldn’t be satisfied with my choices until I got us way over budget! So I’m making the executive decision to hold off unless it’s somehow less expensive to build one, but even then I will stay within the price range that makes it stay the less expensive option. Until then, I will just have fun rendering my own designs, like these two vanities! Both of these vanities are very similar, and I actually just built the double vanity from the single if you couldn’t tell. I love how they look like a piece of furniture and like they have some weight to them.
For the double vanity, I had the boys’ bathroom in mind with the dark countertop. I personally love an extended backsplash, but don’t like how it makes the mirror placement higher. It’d be perfect for our boys’ bathroom because they don’t need to see long hair in the mirror or their outfit. Plus, having the mirror up higher means it’ll probably stay clean longer!
For the single vanity, I decided to add a cute scallop detail to the standard height backsplash and do a countertop with some marble veining. I had our guest bathroom in mind for this vanity, primarily because it’d mainly be used for washing hands and with the lower mirror, you or your guest could see more in the mirror (what if you sat on something at dinner or needed to see if your pants were splitting?!)
I definitely like doing these renders, and it feels like a productive alternative to scrolling on my phone (November goal!). I hope you enjoyed reading! As always, I hope to have real house build news soon!
Thanks for reading!
Davien
-
Financial tips that work for us #2

Hey everyone! Today I want to go over some financial tips that I find myself and Brandon doing in our day to day life. It’s crazy to think that a year ago we still had our mortgage, a student loan, and three car payments!! Now we have zero debt payments. We do have a good income, but if you’re keeping up with the news, you’ll see articles about people with high incomes that are still living paycheck to paycheck. Having a good income gives you a leg up, but only if you use it wisely. Your habits and behavior are what really make a difference when it comes to your financial wellbeing. If you’re interested in my first financial tips post, you can check it out here!
Have a budget
So before I can go into any other tips, I must reiterate the importance of having a budget! Before the month starts, you should know where all of your anticipated dollars are going to be spent. You should know what your gas budget looks like so you can say no to a spontaneous trip or be prepared to take it out of a different category, like entertainment. We subscribe to the budgeting philosophy of ‘roll with the punches’, which is a big part of the YNAB app/mindset. Go over in one category? Cover it from another and either take it as a fluke or readjust expectations for next month. Our priorities are 1. Stay out of consumer debt and 2. Save for our goals. Goals would be #1, but we would prefer to be a month behind on our goals if it means using our savings dollars to replace a water heater or fix a transmission instead of debt. Hopefully those things don’t happen, but there’s a good chance they could!
Save monthly for yearly expenses
I used to have an overall ‘annual’ fund that I would contribute to each paycheck and hope it would cover my annual expenses. Now we put all of our expenses in categories that we fund monthly. Here are a couple examples!
- Vet: $250/year, $20.84/month
- YNAB subscription: $105.92/year, $8.83/month
- Prime subscription: $150/year, $12.58/month
- Truck and trailer tags: $73/year, $6.02/month
- Fusion tags: $258/year, $21.46/month (we’ll keep funding this as is until we learn the updated cost for our new (older) car during the next renewal!)
Of course we also have property taxes, insurance, gift funds, but those were just a few examples. Tracking these expenses separately will help you see their true cost. If we wanted to get rid of Prime, we could save $12/month (but we personally find the value in this with my 5% cashback Amazon card). Also as you can see, a new car is much more expensive to register each year than an older vehicle. If you’re thinking of changing vehicles, you could visually see how those annual/frequent expenses like registration and insurance may be affected. Tracking yearly expenses monthly will also help remind you of what you’re subscribed to. You wouldn’t believe how easy it is to forget you have an annual subscription and scramble to find the dollars (or go into debt) during renewal time!
Weigh financial impact before you commit
This topic aligns with having a budget, but when each dollar must come from a designated (or new) category that has a set amount of dollars assigned, you tend to be more careful of what you sign up for. A big one here is streaming services! Each price hike makes us pause and decide if the benefit is still there. Here are a few things that we do choose to spend money on regularly:
- Orkin: Our house is old and gets so many bugs! This is worth it for our sanity.
- Disney+/Hulu/ESPN:
- Netflix
- Spotify
- Phone plan
Now I’ll tell you what, I’m at my max capacity for streaming services. There will be no Peacock, Paramount+, Youtube premium unless something else gets the boot! That said, I may personally pay for a couple months of STARZ during my maternity leave to watch the new season of Outlander (but that would come from my spend money).
This can also make it easy to see what prices you may want to work on lowering. Last year we worked with the internet/cable company to lower our monthly charge (and stop paying for a landline we don’t have set up!). We previously explored changing Orkin to quarterly instead of bimonthly, but unfortunately the bugs acted up enough that we had to go back to a more frequent visit! Phone plans will be on our radar for next year. My phone is finally paid off, and I’m determined to save up cash for the next one to keep my monthly charge low. I think Brandon is onboard to do the same when we move to our own family plan, possibly next year. We may also play around with keeping a basic plan for kids/teens and a better plan for ourselves (with our on call duties) to also help with cost.
Budget early
It’s November 1st, and I’ve already planned our December budget! I’m not crazy, we just have a system of using our first paycheck to fund our next month’s expenses and our second paycheck to go towards savings. This means I had to have December’s budget ready by November 9th/10th anyway!
What I love about being so ahead with our budget is it gives us time to plan and react appropriately. We know so much about next month’s money that we can spend a little lighter this month if we need to save extra for travel/Christmas. I especially love this with my own spending category. I really want a new work bag for our next trip in office early December. To do that, I’ll need to order the bag in November. If I want to order it in November, I need to have money in November. But I also want to have some cushion in my budget in case anything comes up, so I’ll need to work hard to resist all other temptations!
Plan ahead for frequent household purchases
One way that budgets can get tricky is when it comes to items you need to have money for that don’t have a set replacement date. For us, this is our hygiene items, cleaning items, etc. What personally works for us is having two separate categories. One is called ‘Household Purchases’ and its monthly dollar amount is calculated by all of the items we use regularly around the house, the typical price per whatever size/container we buy, times the number of purchases/year. Then we take that annual amount and divide it by 12. Simple example:
Body soap: $5/container, every 2 months = $30/year
Toothpaste: $4/container, every 3 months = $16/year
Laundry detergent: $22/container, every 6 months = $44/year
Total per year: $90, Needed per month: $7.50
If you’re thinking that’s complicated, I kind of agree. I use a spreadsheet, and I promise we don’t update it often so the monthly number is set it and forget it. When we purchase anything from this category, I do like to put a note as to what household item(s) was bought in YNAB. This can help me make sure I’m setting us up for success by estimating the repurchase frequency appropriately. Or on the other hand, maybe we need to find ways to reduce how often we need to buy a certain item or maybe find a less expensive alternative to keep up with frequent purchases.
What about things we forget? Simple! We use a ‘Household Misc’ for things we don’t plan for such as chapstick, kleenexes, or a set of Tide to-go pens. We also use this fund for the infrequent purchase of batteries.
Find ways to reduce expenses
I love finding ways for us to save money, especially when it doesn’t even feel like a change. One way we reduced our expenses was by making our own glass cleaner, countertop spray, and all purpose spray. Now, we don’t really fly through these products so it will take some time to see the pay off, but after the initial investment cost (buying castille soap, essential oils, bottles), we don’t need to save for new cleaning products because all of our ‘ingredients’ either last a long time or can be found around the house! Plus, I really like the health benefits of not breathing in so many fumes while pregnant.
We also traded in our usage of napkins/paper towels during meals for cloth napkins! It’s so habitual now to just grab a cloth napkin, and I anticipate even when hosting in the new house we’ll give guests the option to grab a cloth napkin to use. This substantially reduced our usage of paper towels. The main use we still have is for anything that’s gross, like a cat hairball. Also, we can’t ignore getting an older car was definitely a way to reduce expenses! With insurance and registration costs going down, we stand to save at least $20/month!
Keep finances combined and have common goals… But have separate spending categories for you and your spouses’ sanity!
Rachel Cruze (Dave Ramsey’s daughter) gets the most pushback on her advice for married couples to combine their finances. Lots of reasons come up such as ‘But I don’t trust him/her with my money!’ or ‘That’ll just make us fight!’ but I think we can all agree that the root cause of both of these problems is not having a conversation about your life goals and finances. Money is one of the leading causes of divorce, so you should be afraid that you and your partner will have money disagreements. You should also work through them!
Plus, you will have nothing but resentment if one partner is working on saving/investing for the sake of the family and another is spending crazy on golf gear or a daily Starbucks/Target trip. You both need to have a clear idea of what you want your future to look like. You should both bear the burden of a financial crisis or make sacrifices towards your savings goal. This means you can both sigh and say ‘we did it!’ when you made it through an unexpected cost/emergency or hit your investment goal.
Now it’s important to give each person some spend money, no matter how little that may be. This is money that you don’t have to agree on. For instance, Brandon can spend some of his spend money on beer, and I can buy a digital art print from Etsy that Brandon insists I can make myself. No arguing, we can spend our spend money how we want!
Spare change category
Brandon and I saved for our baby fund by taking any credit card points, savings interest, or unexpected money and putting it a special savings category. I love looking back at the sheer number of deposits we made to this fund! We had some for cents, a couple dollars, and of course some bigger ones from insurance refunds or interest. This is one of my favorite ways to save because it almost feels like putting spare change in a jar! This will definitely be a hit when we’re saving for furniture in the new house or working on the last bit of our future mortgage!
KNOW YOUR WHY (repeat tip!)
When you’re building a custom home (especially a long term home), it can be a lot of pressure to get it right the first time or make it perfect on the first try. If I think of being stuck with this mortgage for 30 years, it makes me want to get everything done first because I’ll never have the margin again to do design changes or splurge on something down the road. However when I think of us paying our house off in 3-5 years, I have no concerns with picking good options in our budget (where it makes sense) and then being able to revisit certain rooms/finishes down the road when we don’t have that monthly payment. I like the idea of being able to really take my time, tell the sales person at Floor and Decor ‘yes I am working on a project!’ or visit a slab yard without feeling like an imposter! It truly feels like a short term sacrifice for long term peace and design fun!
I hope you enjoyed my financial tips. Remember, this is what works for us! So take what you like and just leave what you don’t. I’d also love to hear about your financial goals or tips that work for you or your family. Feel free to reach out!
Thanks for reading!
Davien
-
Our new car!! 2013 Dodge Durango

As you know, my car was stolen last month! …then recovered, without headrests or floor mats, as well as a cut off driver’s side seat belt. With our insurance policy, the car had 10 days to be found before it was written off as a total loss, and the police did find it within those 10 days. We had to pick it up from a tow yard, and Brandon drove it the 2.5 hours back in that condition. For the short day that it was at the tow yard, it accumulated a bill of $200!
Anyway, the car had a sickly sweet smell due to the individual(s) smoking and hanging up multiple air freshener trees. The smell alone (along with the bad vibes) convinced us that this was a great time to trade in the car for something new (to us) that would have more seats for the baby + boys.
As far as the overall process, we worked with the local body shop to get a seat belt installed (over $300!) so we could drive it to a Ford dealership for an estimate of the repairs. We then drove it to the dealership, where they gave us an estimate and insurance approved the repairs and gave us a check to cover the damage to the vehicle. We were planning on getting the repairs done, but the inconvenience of having to drive separate for 2 two hour drives was not appealing. Ultimately we decided that just trading it in sans repairs (we own the vehicle outright) would be the best choice for us. Before we traded it in though, we decided to get some new headrests from eBay. I’d actually never bought anything from eBay, but it was a great experience and they came fast! We had to go this route because my 2019 Ford Fusion’s headrests were discontinued.
Once we had the headrests in, we were ready to trade it in for something different! Our biggest criteria for the new vehicle was 1. at least 7 seats (there’s going to be 5 of us next year!), 2. reliable, 3. back up camera, 4. in our budget! Since we prioritized paying off our vehicles within the past year, we made a decision to never have another car payment. Once you get that money freed up in your budget, you’ll never want to go back! We had our eyes on a 2014 Toyota Sienna (heard great things about Siennas from my friend!) but also knew there was a 2013 Dodge Durango that we could look at as a backup option. We found both of these cars online at Granger Motors, and a sales person named Samantha reached out to schedule time with us.
Our ideal state for the car was to have an even trade where we don’t have to pay anything for whatever we get. We knew that our car would be valued at less than we’d get in a private sale or pre-damage, but if we could trade for something that suited our needs while not touching our insurance check, we would still be in a good spot. Overall, we knew we were trading convenience/time for maximum profit.
At Granger Motors, we let Samantha know what we were looking to do, and we test drove the Sienna while she valued our trade in. We did notice that the car was LOUD (like driving a truck loud), had a cruise control operation that would take some time to get used to, and after exiting the vehicle, the tires smelled hot. We’re very familiar with that smell because Brandon’s truck has needed fixed for that twice! What we liked about the vehicle was the size, storage upfront (it had a perfect spot to put my belt bag!), sunroof (for me, Brandon couldn’t care less), and the smooth turning. When we got back, we told Samantha our concerns and asked to test drive the Durango while she checked out the Sienna with her manager.
The Durango was love at first sight! It was SO CLEAN and had a similar feel to my car upfront. I thought we wouldn’t like two rows of bench seats in the back, but the layout felt much more future baby friendly in terms of me being close to the second row. I also liked how when we take the baby home, I could sit in the middle close to Brandon versus the captain chairs where if I needed to be close to the baby, we’d have to sit in the far back. Plus, it’ll mainly be kids going to the back, so there’s really no impact to us adults. We also loved how there were heated seats not only in the front, but in the second row! The second row had an outlet for charging, which means the boys can plugin their own cords instead of passing them up to me. Brandon liked the storage compartments in the trunk that could house jumper cables or other tools. Overall our biggest plus was how quiet and smooth it drove. We kept asking ourselves is this the right car? No way it’s priced under $14k!
When we got back from the test drive, we immediately told Samantha we want the Durango! She let us know that our Ford would be taken at $14k, and we’d get $12 back then need to pay taxes/document fees. Well, we took our first spin at negotiating and requested they pay any taxes/document fees/etc. After a brief wait, we had a deal!! We walked back to the finance department, signed a few papers with no cash exchanged either way, and walked out with a new ride fully owned. YAY!
Shortly after driving away (we drove fast in case they regretted their decision!), I checked the glovebox and opened the car’s manual. Now, our baby’s name is being kept secret (we are not accepting feedback on it!). It’s a beautiful name, and while not unique, you rarely hear it. This isn’t the same vibe of name, but for this story we’ll use the name Marley. Imagine you bought a used car (not even the one you were planning on getting), open the glove box, and find a paper from a previous owner and her name is Marley! How crazy is that? Well, that was us!! She wasn’t the previous owner, yet still hung around in the glovebox!
That same night, while I was pairing my phone to the Bluetooth, the car told me to pick a priority between 1 and 7 and I said 1. The car said ‘Priority 1 is already taken by: ‘ and then a recording of a girl saying ‘Marley Cell’. WHAT! We were shocked!! We told the phone NO! when she asked if we wanted to overwrite priority 1. So we’re now priority 2 in the car’s system LOL. Can you imagine though?! This is clearly a sign that we have the right baby name and car! (Reminder though, it’s not Marley).
A hidden perk of our new car is that it’s so old (in age, runs great!!), that our registration will go down to just $50 next year! That’s way better than the $258 I was paying each year for my Fusion. We also use the remote start way more than with my car because it’s on the key fob instead of an app.
Now I hesitate on even mentioning this as a con because it actually turned out to be not an issue at all, but the tech obviously is the main place where you can tell it’s 10 years old. The Bluetooth is more old school than my car, but we did get it figured out. And playing The Ramsey Show podcast on a longer drive made it feel just like home!
Overall, we feel like both us and the dealership got a win-win situation. Plus, this gave us an opportunity to test our declaration that we would never have a car payment again. If we weren’t so set on finding something in our budget, we probably wouldn’t have even looked at this price range and found this wonderful vehicle!
Thanks for reading!
Davien
-
3D Render: Dream Office
Brandon and I both work from home, so a home office that we enjoy is very important when you think about how much time we spend in there. Currently we have a small, windowless office in an otherwise unused basement. Ideally our new home office would have lots of light, be close to the kitchen and front door, and have some cozy elements.
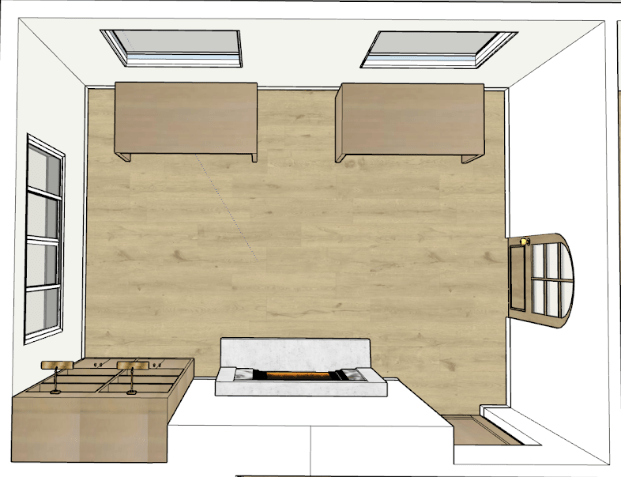
Below is a 3D render of our dream office layout. we wanted a big window facing the front yard that would let us see who’s coming and also let light into the kitchen. We have the fireplace and bookshelf along the entry wall to help reduce some noise from anyone coming in/out. On the far wall, we have where we’d place our desks!
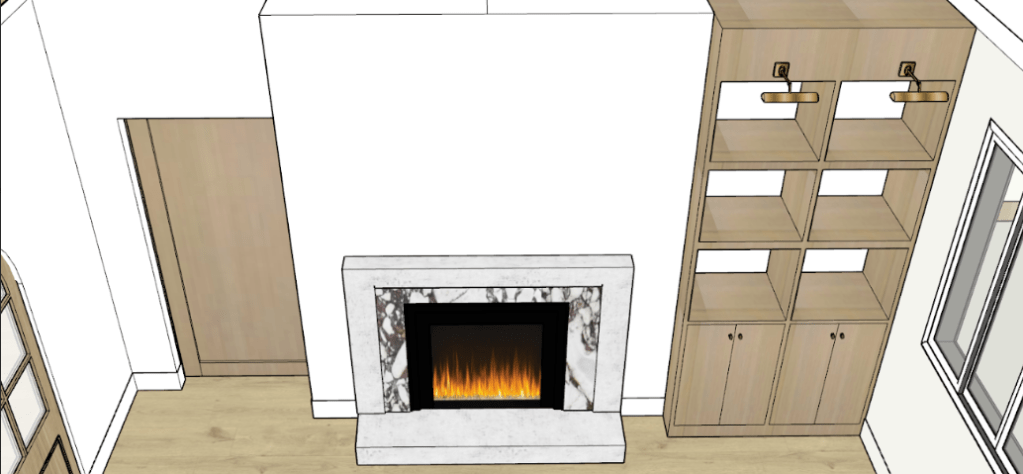
Here’s a view of the barn door (to the entry), the fireplace, and the bookshelf. The fireplace we have in mind would be plaster with a marble surround. If a marble fireplace surround isn’t in the budget right away, we’ll ask the builder what we can do now that will make it easy to upgrade in the future.
On the right, we also have some bookshelves! Ideally we’d be able to fit our books, as well as a printer in the cabinets. If there’s room, we could also store our work bags in the cabinets.
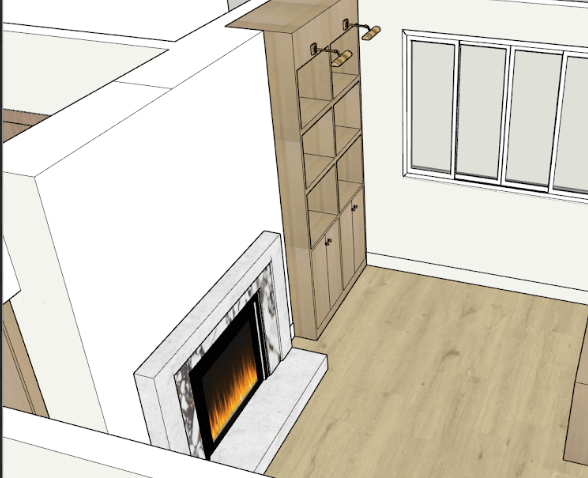
Another view.
Close up of the desk positioning. We like to work side by side! I think as long as we got our finishes right in this space, I wouldn’t be in too much of a hurry to invest in our desks/chairs. We each currently have a good sized desk (L shaped) that could get us by for a while, but eventually I’d love to work on something cool and custom with drawers and additional storage! That would definitely be a project down the road, maybe as a little self-investment if we were to get a good promotion.
Here is the view that you’d have from the kitchen into the office.
And here’s the view you’d have from inside the office, looking out to the kitchen!
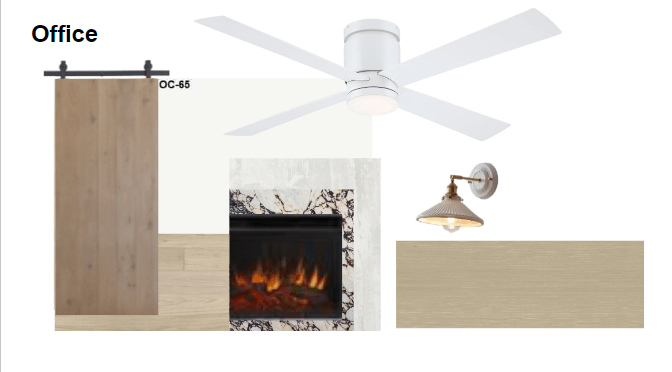
This is the overall mood board we have for the office. Most of what you see should be pretty similar to our rendering!
Now one caveat about the desk placement, I did do some research that monitors in front of windows could cause some eye strain, but I didn’t want to bring in less light during this phase of us having a two desk office. Someday we’ll retire and maybe we’ll need all of that light for a reading room or library! One compromise I found was having cute curtains (which I love anyway) to cover the part of the window at eye level. Here are some examples of that!

Laine and Layne 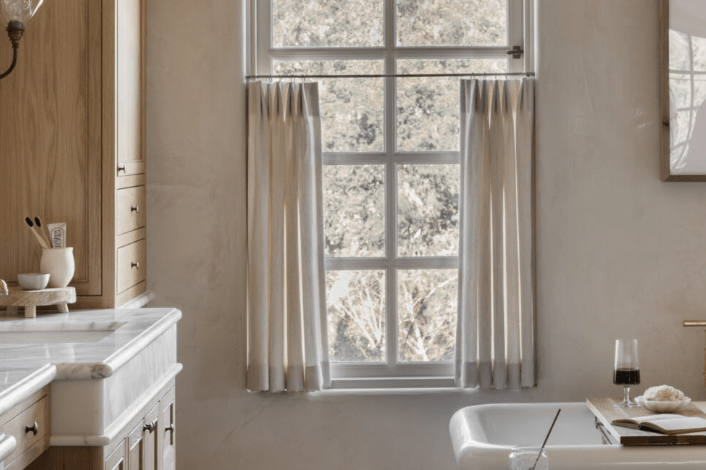
Amber Interiors Overall, this is one of the spaces we’re most excited for! We work very hard at work and having a nice place to spend those hours would feel like a treat. On the furnishing priority list however, it’s probably beneath most of the other rooms. Either way, I’m so excited to meet with the builder next month and start getting some numbers to what we’re thinking. We’ve been financially preparing for this and manifesting our dream house for years, so I think we’ll be in good shape to get building next year!
Thanks for reading!
Davien
-
Our wedding recap!

On July 22, 2023, I married my husband Brandon! We had a fairly low stress wedding, and the simplicity made it so easy to enjoy the weekend with family and friends. We had a clear vision of what we wanted while planning our wedding, and I’d like to share how we did that for any future brides. I’m also going to talk about our favorite elements of the wedding and anything we learned along the way!
The most important thing we did in the planning process was having a clear idea of what our intentions were for our wedding. I frequently asked myself “am I doing this because I want to or because it’s expected”? That helped me prioritize choices and decide what worked best for me and Brandon. A few examples of this include forgoing the bachelorette/bachelor party (we’re in our prime relax at home era), skipping a bridal shower (another thing to plan!), and not waiting to wear our wedding bands (we spent the money, why not enjoy them early!). I know Instagram can be very influential and make you believe that you aren’t celebrating being a fiancée if you don’t have a bachelorette party on the beach, but don’t fall for it! The engagement period is such a fun time for planning a memorable day and preparing for marriage, but it’s not the time to stress about things for the sake of how they look. One thing I always kept in mind was whether what I thought I ‘should’ do or ‘should’ have was expected 40 years ago. So many things are being marketed as normal or necessary, and it’s not worth the stress or money to keep up with trends. Make sure you’re planning the right wedding for you and your spouse. Brandon and I knew what was really important to us was getting married and celebrating our special day! Thinking of our wedding as a ‘public elopement with a reception to follow’ made us less influenced by the wedding market.
Choices we made that we don’t regret:
- Skipped having a wedding party: I knew I would put my full force into planning this wedding, and it’d be easier to do if we just had a best man and maid of honor to keep looped in. It was also a good decision for us because it meant less pictures we’d need to take and we could skip the rehearsal. With our wedding being further away for my side of the guest list, I liked that everyone (outside of my immediate family) only had to commit to one day of the weekend for any festivities.
- Made our own cakes: We made 4 vanilla, 3 strawberry, and 3 chocolate cakes on the Thursday before the wedding. This ended up taking us just 7-8 hours (including baking and frosting), although we did make our strawberry reduction the night before. This was great for us because I have been vegan for ~10 years and didn’t want to have to worry about finding a baker that would suit my needs and taste great. I loved how we were able to practice each month and knew exactly how they would taste. Plus, it definitely saved us money!
- Our sweetheart table: I loved having a little table that was just for us. It gave us some privacy while we ate and just looked cute!
- Sticking together: We woke up together, spent the morning together, and except for the ~30 min between me putting on my dress and our first look, we spent the whole day together! When we went around to every table to greet guests at the reception, we did it side by side! Your wedding day goes by so fast, we didn’t want to spend more than a minute apart. I love how we have the same memories of that day because we really did spend it together.
- Did my own makeup: I LOVED doing my own makeup. Did it look like the professional makeup you see done on Instagram? No. But I was comfortable in it and wasn’t trying to clean up areas that I didn’t like. For me, I loved knowing what my face was going to look like instead of wondering whether my makeup artist would do a good job! Plus – it saved money!
- Made our flowers: ZERO regrets for the DIY flowers! I loved how they turned out and knew exactly how they’d look. (Can you tell I don’t like unknowns?!) Plus, I am definitely reusing our table arrangements for my baby shower!
- Short ceremony: Our ceremony was insanely short, less than 5 minutes! But we knew it’d be HOT and didn’t want our guests (or us) sweating or getting overheated. I’m glad we kept in short because in the moment we were both so nervous!
- Photobooth instead of guestbook: I knew I probably wouldn’t look at our guestbook much, so we wanted to explore other options for remembering who was able to make it to our wedding. I love how many photobooth pictures our guests took, and I’ve looked through them a handful of times already!
- Creating a charity registry link: We had so much support on our St. Jude Children’s Hospital charity event and were blown away by the contributions of our guests. I love how one of our last memories on our wedding night was sitting on the floor together making our own donation!
- Not requiring tuxes: Brandon purchased his own tux, so that was easy to work out the logistics for. However, it just seemed silly to have the boys and my dad rent and wear tuxes on a hot summer day just for the sake of pictures. We decided to have the boys wear khaki shorts, lightweight polos, and white slip on shoes that they could wear after the wedding too!
Tips for future brides:
- Wait until you’re in a situation to decide how you feel about something. It’s easy to read wedding forums and think ‘I would never be ok with that!’ but you may be surprised that certain things aren’t a big deal to you when you’re in the moment and have the full context.
- We had a table for guests to work on a 1000 piece puzzle of our engagement picture, and I never saw the puzzle unattended! Guests loved an entertainment option that wasn’t dancing! (Bonus tip, get it started with family/friends the night before that way guests are encouraged to work on it!)
- PREPARE FOR MARRIAGE! We completed our premarital workbook before our wedding and knew where we stood on parenting (although it was a little late for that!), work, finances, intimacy, family, etc.
- Stick to your budget and decide on it early! We balanced our pricier choices with DIY or lower budget options. Everyone says you’ll go way over your budget, but that’s only if you allow that to be an option.
I hope you got some good advice you can use for yourself or a friend in the wedding planning process! As a newlywed of more than two months now, I can say the wedding was such a fun time, but nothing compares to the safety and comfort I have with knowing that I have a partner in life. When my friend and I had our hotel broken into, it was so reassuring to know my husband was dropping everything to come be with us in another state! I wouldn’t trade that feeling for anything!
Thanks for reading!
Davien
-
Replenishing my stolen belongings!! + pregnancy announcement

Today’s post will be a double life update, with announcing a baby girl due next spring and the fact that my belongings + car were stolen from a hotel a few weeks ago! My bag and keys were taken within a few hours of leaving our hotel room (locked!) and my car thankfully has since been recovered. I think we’ll keep it for a while longer with a goal to sell it by next fall (2024). I’d like more seats since we’ll be a family of five with the baby, but I think we could get by for a handful of months after her birth.
Anyway, this post will be about what items I repurchased from my stolen belongings, what did I decide to try from new brands, and what did I ditch completely!
Invisalign retainers: repurchased
I can’t believe the thief/intruder took my retainers, ugh! I went my first night without them thanks to this experience, but I was able to wear my last set of trays until my new retainers could be picked up. Funny enough, the dentist actually gave me the wrong trays on accident. I came back to their office because I couldn’t get them on! After she tried herself, we realized I had someone else’s brand new retainers! This one stolen item ended up costing me $500 to replace!
PUL device: repurchased

Amazon This device makes it super easy to remove your retainers without long, strong nails. I always keep mine in my case, and I use it every morning! I did repurchase in blue instead of pink this time. This is a personal must have with the Invisalign system.
Retainer/aligner case: ditched
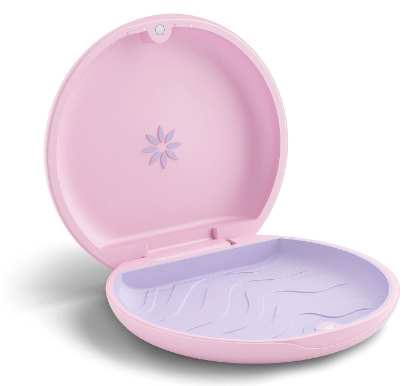
Amazon I did have a super cute pink/purple Invisalign case, but I found that it was getting so hard to keep clean. The material is almost like a soft plastic, and there are ridges on the inside of the case that just accumulate filth. While waiting for my new retainers, I just used the simple black case that my last ones came in. I think this is so much easier to keep clean, so I won’t be purchasing a new case.
AirPods: upgraded then returned after being gifted previous model
I LOVED my Gen2 AirPods and had them for 5+ years! I was so sad that mine got stolen but decided this would be a good time to upgrade. I tried the Gen3 model, but I found that they wouldn’t stay in my ears for long and when they did, they started to hurt. My dear friend had a pair of Gen2 AirPods laying around that she never used, so she was so kind to gift them to me with a cute case! I ended up returning my Gen3 AirPods and sticking with what I know!
Backpack: upgraded and then some!
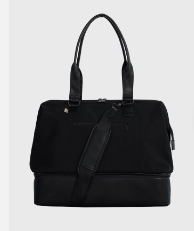
Beis 
Beis My go to travel bag was a black backpack (like school bag) I’d had since college. When I find something that works, I take good care of it and make it last! However, it’s long gone now. Before our trip, I’d been wanting to try out the weekender bag from Beis. Well, this was the perfect opportunity to be forced into an upgrade! It’s currently in the mail, and I hope I like it. I also decided to get a toiletry bag from the same brand.
Perfume: repurchased and then some!
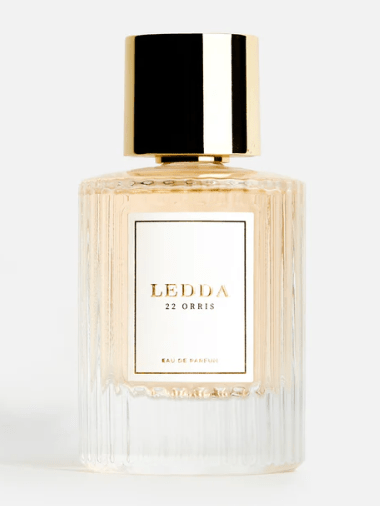
LEDDA 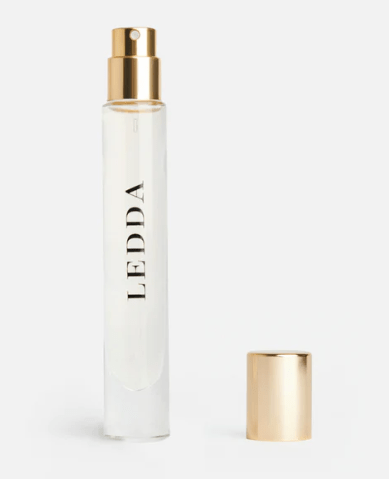
LEDDA Brandon gifted me this perfume for Christmas, and I loved the scent! It was a no brainer that I’d eventually repurchase it to replace mine that was stolen. Well boy was the timing right! This past week they launched the first travel spray of this perfume, so I went ahead and bought it. I also bought the full size bottle since I know I’ll get through it, and it got me free shipping. (Full disclaimer: buying the full size bottle to get free shipping was not a financially savvy move, but it did tempt me enough to do it LOL.)
Blush: tried new

Target I did have a MAC blush which I liked but wasn’t in love with. I found a super inexpensive blush at Target that I ended up being pretty happy with!
Mascara: repurchased

Target This mascara has been my go to lately! I’m not a big fan of trying new mascara or splurging on it, so I stuck with my tried and true!
Deodorant: repurchased

Target My Native deodorant in Blueberry Sour Belts was so good, it made it into my 2023 summer favorites! Unfortunately the scent was gone, so I branched out to a different Native deodorant. I ended up with grapefruit and bergamot, and I do like it! It’s a lighter, more refreshing scent that won’t distract from my perfume!
Face products: repurchased

BeautyCounter I have not been having an easy time with my skin during this pregnancy! It’s really not the baby’s fault, I think it’s just my skin when I’m off the pill. However, I tried to make a mini face scrub and curology gel moisturizer work while I debated on repurchasing my expensive skincare. After a couple weeks of temperamental skin, I decided to go back to what I know. The scrub was drying out my skin yet not improving it, and overall I felt it was too harsh. I’ve just had one night back with my Beauty Counter products and while it’s still too early to tell, I’m hopeful it’ll help get rid of some irritation.
Jeans: tried new!
A tragedy. I learned that my favorite AE denim wash (that I literally wore/repurchased for years!!) was discontinued after I tried replacing my usual size last year. Well, a recent declutter of my clothes helped me find a size up pair of the same wash/style that I could wear for some of pregnancy and hopefully post partum! Nope, I took them to Kansas City, and they were stolen!
I decided this was a good time to just try a maternity jean early instead of repurchasing denim that I may not be able to wear for long. I really like the two pairs I got, and you can’t beat the price! My one disappointment is they are a little baggy in the legs since I’m short. It’s not too bad, and better to be too loose than too tight!
Tweezers: tried new but regretting
I got a cheap pair of tweezers at Target to immediately replace my Tweezerman tweezers, but I’m not a big fan. I feel like I reach for an eyebrow hair to pluck and unfortunately snag my skin. I was hoping to get by with a cheap pair, but I think I will eventually repurchase the Tweezerman brand.
Makeup brushes: tried new!

Target 
Target I replaced a few of my Jeffree Star brushes that were stolen with Sonia Kashuk ones. The price was awesome for the quality, and I could definitely see myself purchasing more of these brushes in the future.
Makeup bag: still needed!
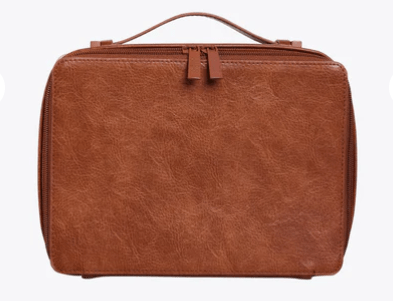
BEIS I had my (now stolen) Jeffree Star makeup bag for many years, so I feel safe splurging a little for something that has great functionality. This particular makeup bag stores brushes too, so I could keep all of my makeup together and ready for travel without accidentally forgetting my brushes! It also comes with a mirror that can stand on its own. I love that it’s a bigger mirror which is great for making sure that the back of your hair is looking fine. I plan on buying this bag in the next month or two, as soon as I test out my other bags from this brand and set aside some spending money!
Simple eyeshadow palette: still needed
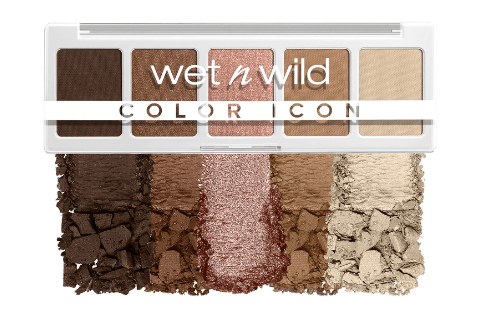
Amazon I really liked this eyeshadow palette for quick daily use, but I think I may explore other options down the road. I might put something on my Christmas list since I’m not in too much of a rush either!
While this whole theft incident makes me not trust hotels (although I’ll continue to go to them), it was a blessing in disguise for forcing me to re-evaluate what I use on a daily basis. There were a handful of things that were stolen that I didn’t bother replacing. It forced me to upgrade some items that I’d been putting off for a while – mainly my choice of travel bag!
It also was a good lesson in the value of making sure you are prioritizing an emergency fund. This incident caused some unplanned expenses, but because we really prioritize our financial wellbeing, it was just a huge inconvenience instead of a life changing event or stress with a baby on the way. It also is a HUGE reminder to take care of your vehicle(s)! We babied my car. Kept it free of junk and made sure that it was kept clean. It was very easy to see what damage was there due to the theft and pinpoint what was missing from the car. Our car being paid off made everything less confusing because we owned it outright. It was easy to prove ownership at the tow lot and decide where to take it for repairs. If we had decided to sell it to get rid of the memory of this event, we could do that without approval from a bank or concern about being upside down on a loan. Brandon and I have good jobs which makes it easier to save, but little choices in your day to day can make a goal like owning your vehicles obtainable. I know when we trade in my car in the next year or so, we’ll likely be downgrading in order to own the new (to us) vehicle outright!
Thanks for reading! I hope to have house updates (meeting with the builder next month!) and maybe some baby related posts coming up soon!
Davien
-
Bathroom mood boards #1
Hello all! I decided to fiddle around with some bathroom ideas because our secondary/guest bathrooms still feel up in the air a bit! We’re hoping to keep them budget friendly, but until we know our numbers and what things cost, we might as well dream up some ideas! I’m hoping that we can splurge on one thing in each bathroom and use less expensive materials to help offset. Whether that be with the countertop, flooring, or vanity cabinets – who knows!
One challenge I gave myself with these mood boards was to make all of the bathrooms cohesive. Being able to reuse material across bathrooms can definitely help keep costs down since there is almost always waste/overage in a project. In the future, I’d love to try to pay more attention to cost while designing these mood boards to see what I can come up with!
bathroom #1
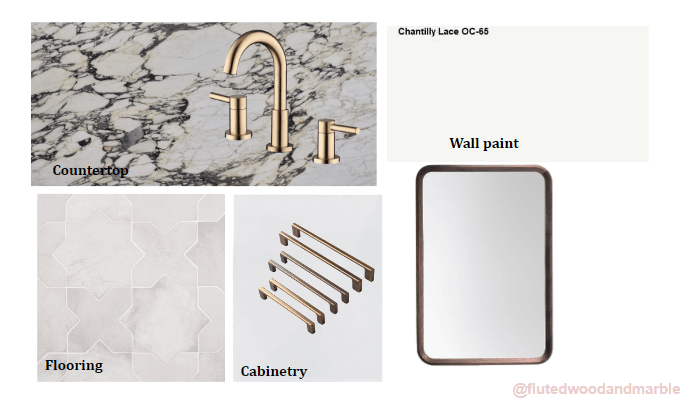
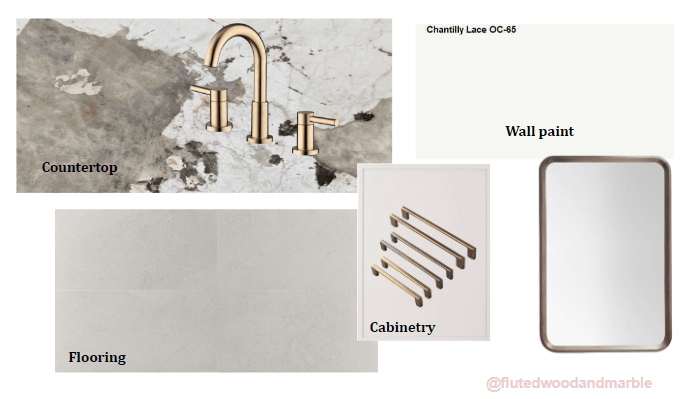
The first mood board I have is somehow bold and muted at the same time! This bathroom would feature a Calacatta Monet honed countertop, which is one of my favorite countertop materials. The flooring would be a white star and cross tile from Tilebar. For cabinetry we’d do a door design that’s clean like a slim shaker or slab front, and a simple white to not detract from the flooring or countertop. The wall paint would be a white (mainly to match with the rest of our house). Finally, the mirror, cabinet pulls, and faucet would bring out those warm, dark tones in the marble. This bathroom would definitely be a splurge, but it’s so pretty! Doesn’t hurt to dream!
bathroom #2
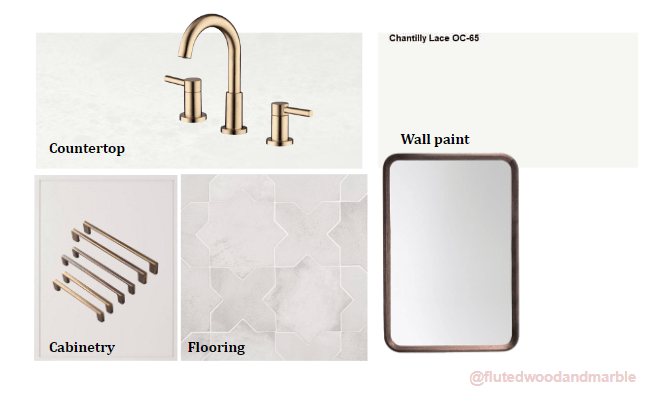
This second bathroom mood board is a little more subdued! The wow factor is limited to just the countertop, which is a bold porcelain that shares similar colors to the Calacatta Monet. The limestone look tile is from Tilebar, and helps to keep things simple. This time around, I picked a creamy, almost beige cabinet in a slim shaker door style. Finally, for the sake of cohesiveness, I kept the faucet, cabinet pulls, and wall color the same. The mirror however is a tad lighter than the previous board. This bathroom to me looks like it would be in a desert resort!
bathroom #3
This final bathroom board is very soft and airy! It almost reminds me of cotton candy! I reused many of the previous finishes here. The only different finish I selected was a quartz countertop from Silestone called Nolita! I wanted to play with a quartz option on this design since it’s easier to plan for a quartz (given that it’s man made) than something with variation like a marble/quartzite. Plus, I can’t ignore the benefits of having a material that is more durable in a bathroom space.
Which bathroom was your favorite? I really enjoyed putting together these mood boards and am looking forward to experimenting again, although I would love to be doing more real designs for our house! Now that it’s September, we’re just over 3 months away from our home build year. While our last communication with the builder was end of March, we ultimately decided to not reach out again until it gets closer. At this point we’ve surpassed our down payment goal, so we’re just going to keep saving for the next couple months as we wait for the design phase to start. Fingers crossed we’ll be designing for real by the end of the year!
Thanks for reading!
Davien
-
Subscribe
Subscribed
Already have a WordPress.com account? Log in now.
